Another month, another Battle Report (BatRep) for my World War III: Team Yankee in 6mm scale local group. Wait a minute, did I miss December's BatRep? you're asking yourself. Fear not, loyal reader, you did not miss the BatRep in December, as between the holidays and a bout of COVID, we did not play in December. Sorry about that. But we managed to get a game in for the first month of 2023, and here it is. Lessons Learned before I forget them - I don't care how tempting that cluster of vehicles are right at the beginning of the game, especially when you have a One Shot Salvo weapon on your aircraft, if that cluster includes the Dedicated AA tracks and using that Salvo weapon puts you in their range, pick another target; our local meta has been focused more on infantry over vehicles, so cheap glass cannons with Guided weapons are not what you should be bringing to the fight, they are not going to be as useful as you think; everyone is vulnerable to Side Armor shots; to paraphrase an old adage, throw enough men and materiel at the Objective, and something is bound to stick; gun AA is much more flexible, but you pay for that in range, so keep them near the Units you want to protect, or get smaller, multiple Units of gun AA, but that also makes your umbrella less effective (no one said this is easy); Spearhead is super important, more so for Attackers, but must be used in moderation; and artillery is more useful against infantry, mostly for the Pins they cause rather over everything else.
To this month's fight, Uriah brought out a British Medium Recce Squadron - two Spartans in the HQ, two Troops of four Scorpions, a Troop of four Scimitars, and four Strikers. From Divisional Support, three Chieftain Marksmen, two Harriers, two TOW Lynx helos, and then a Troop of three Challengers from Cross Level Support. Uriah was to face Brandon, but Brandon was detained elsewhere (no, he wasn't arrested... this time) so I played and pulled out an East German BMP-1 Mech Battalion - BMP and rifle team for the HQ, three Companies of five BMPs, four rifle and RPG-18 stands, three stands of RPG-7s, and an extra SA-14 Gremlin stand, seven T-72Ms, four Shilkas, three Spandrels, three Carnation artillery pieces, and a four BMP Scout group. And yes, that is all inherent to the Battalion. From Divisional Support, another four BMP Scout group, six Su-22 Fitters, and a BMP OP. Yes, this is a bit of a BMP Horde army, as you have 25 BMP-1s (well, 24 plus the OP, which looks like a BMP but isn't) and 24 stands of infantry, which is a lot to buy in 15mm, but a lot more affordable in 6mm. Quick note, that OP really should be in another vehicle, as they've removed the cannon and Sagger ATGM from the track and left it as a spotter and has only an MG. I think I'll get a Soviet jeep (think they used the GAZ like we use HMMWVs) (okay, research done, the GAZ was WW2-era, the one used in the time of TY is the UAZ-469, and yes, GHQ has them in our preferred scale, I will have to pick some up and share them around, as they come in a five pack and you can only use one in any WarPact list) to more realistically represent what the Soviets would have used for their OPs, as well as differentiate it from all the other BMPs. No, I did not use my new National Guard list I'm doing up for Red Dawn, as it's not done yet and we still try to do Red on Blue and not Blue on Blue or Red on Red fights. Uriah's list looks super weak, but let me tell you, all those Scorpions and Scimitars lasted longer than his Challengers did, which is why we have nicknamed them cockroaches. This fight went all the way to the final bell and really could have gone either way. Uriah did say he'd make some changes for next time, like drop the Strikers and bring something else, like more Scorpions/Scimitars. Maybe if I had been more diligent and effective with my Fitters would he have considered some missile AA options, but as it was, the Marksmen were fine and carried their fair share, on both air and ground targets.
We rolled on the Mission table, WarPact choosing Attack and the Brits choosing Maneuver, and the roll resulted in Counterattack. Uriah picked his quarter, I chose the quarter longwise down from Uriah, and it was on. The Brits, as Defenders, had the Challengers in Reserve, and one of the Scorpion Troops in Ambush.
 |
| Still recovering from the holidays, I just didn't feel like getting too fancy with the terrain. |
 |
| And the result is... |
 |
| ...Counterattack! |
 |
| British deployment. |
 |
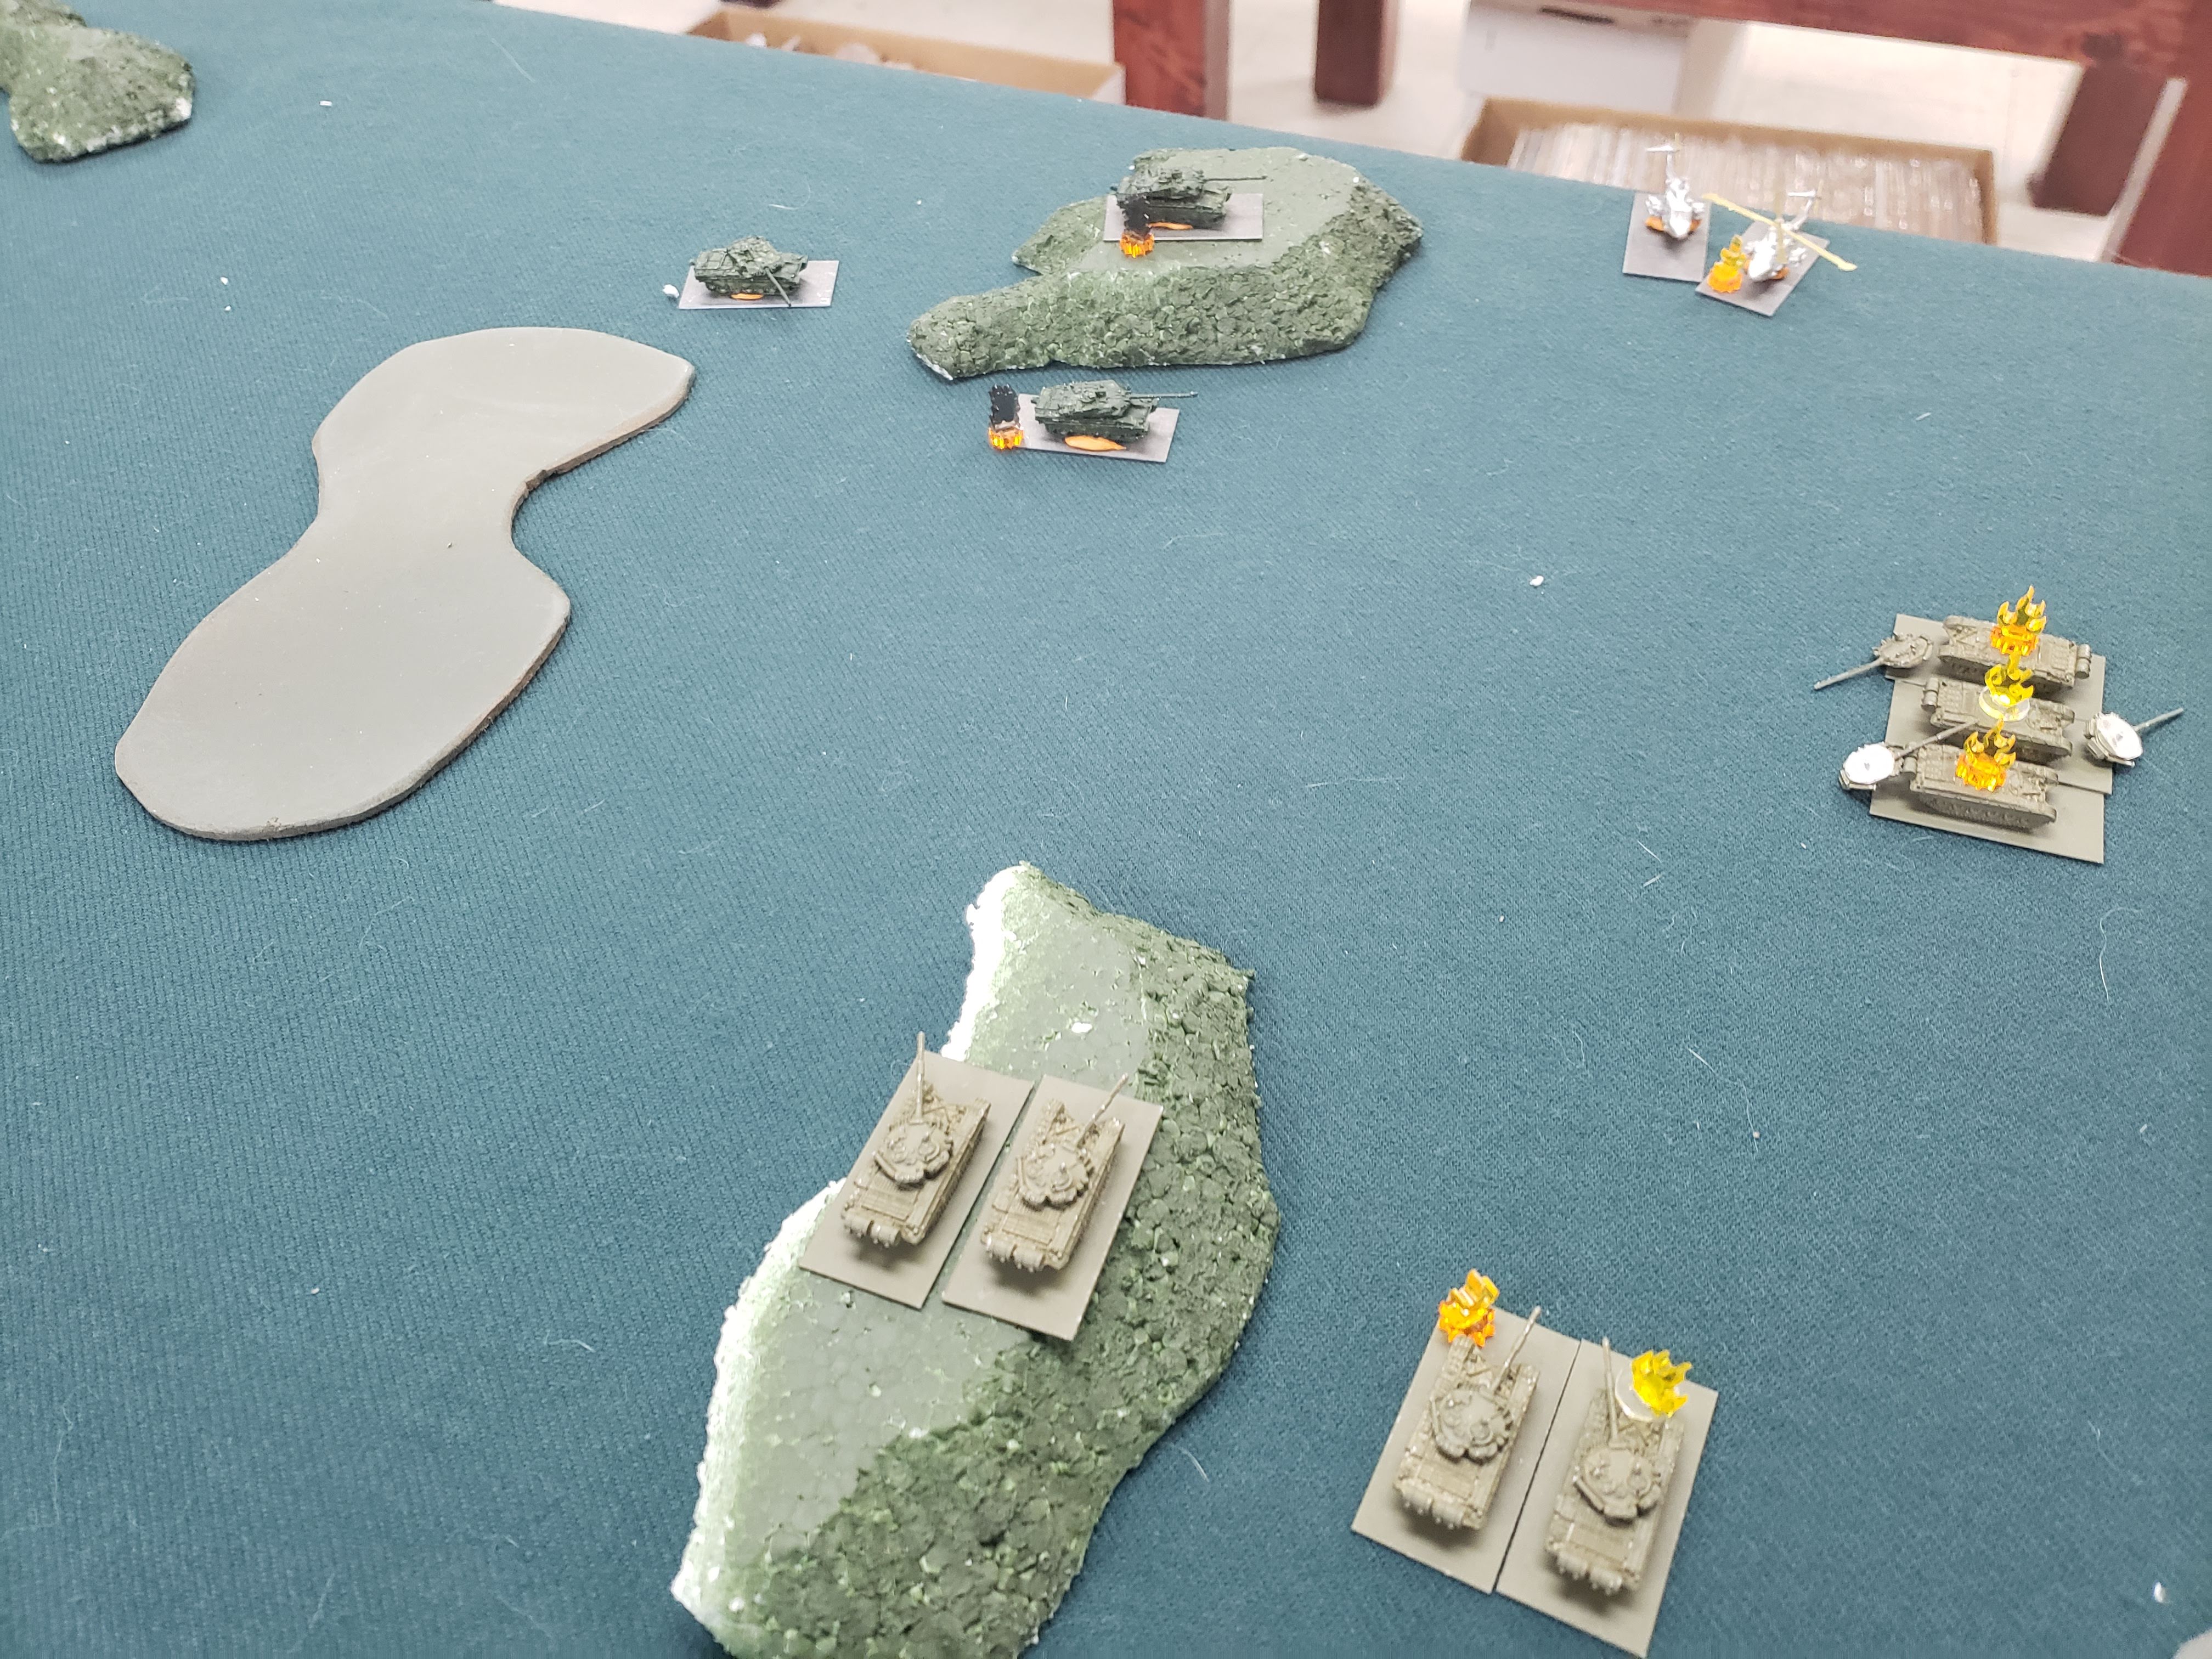
| The beginnings of the East German deployment. Note the use of Spearhead to get many Units forward and into position. |
 |
| The East Germans keep going... |
 |
| ...and going. The 2 BMPs behind the Shilkas are the OP and the command element. |
TURN ONE - Attacker goes first and I get my Fitters in on the first roll of the game. Don't worry, as always, RNGeezus will rollercoaster this game like all the others, for both me and Uriah. The cluster at the back of the British formation is too tempting and as I have only a One Shot Salvo template with the Fitters, I go for it. As Admiral Ackbar is famous for saying, it indeed was a trap I threw my strike aircraft into. *sigh* Everyone else charges forward - the Challengers are in Reserve and yes, they will show up before the Objectives go live on Turn Six, but while they are not on the table I need to take as much ground and remove as many opposing vehicles as possible. I remove one Striker and Bail two others. The Spartan command element is removed from the game (wiped from the face of the Earth!) entirely. The Deployed Scorpions suffer a casualty. Artillery, even though it is Ranged In close to two Units is not close enough for government work and sits silent. Then we get to the strike aircraft, my six Fitters - the Marksmen light them up and remove four out of six aircraft. The Salvo goes off, Ranges In on first or second roll, and ultimately does zero damage to anything under the template. I attempt to Shoot 'n' Scoot everything except the artillery, OP and command, (should have moved OP sooner than I did) and only get one of the BMP recon Units just a little closer to the schwerpunkt.
On the Defender's half of the Turn, everything Remounts, Reserves come onto the table, and strike aircraft show up. Don't worry, RNGeezus giveth and RNGeezus taketh away. Also, the Ambushing Scorpions show up exactly where I figured they would. The horde of BMPs bearing down on the Brits take the brunt of their return fire, almost wiping out one whole recon Unit (three destroyed, one Bailed), two BMPs destroyed and one Bailed from one of the Mech Units (with just one stand of infantry not making their Save), another BMP destroyed out of the other Recon Unit, and the Harriers swoop onto one of the other Mech Units to destroy one BMP (no infantry stands failed their Save in this attack). The Challengers move forward but don't get a line of sight to anything, but stay lurking in the back field, the ominous Jaws theme playing.
 |
| Yes, I need to get magnets into my strike aircraft... and paint on many, many other minis. |
 |
| And yes, those helicopters were landed, but they made their saves anyway. |
 |
| Threatening the far side Objective. |
 |
| T-72s coming up to add weight of fire. |
 |
| Shilkas moving cautiously at this point. |
 |
| Artillery waiting patiently. |
 |
| Yes, I know, more painting to be done. |
 |
| Shoot 'n' Scooting BMP Recon. |
 |
| Harriers retaliate. |
 |
| Scorpions show up and everyone fires on somebody. |
 |
| Lynx and Scimitars move to cover the far side Objective. |
 |
| Catching hate. |
 |
| DUH-duh. DUH-duh. |
TURN TWO - The East Germans try to Remount and Rally as many as they can, but only get a few back into the fight. The BMP Recon Unit down to one Bailed BMP fails Remount and scampers to the hinterlands. Whatever Units can move forward are doing so, under a hail of fire. No joy from strike aircraft this Turn. The T-72s scamper into deeper cover to start the dash to threaten flank shots on the newly arrived Challengers, while the OP finally moves to where they can do some good, which won't be available until next Turn. I move the command BMP into the woods, hoping to pincer the approaching Challengers from the side next Turn with the BMP's Sagger, but immediately Bog at the edge of the woods. *feh* At the sharp end, another Striker dies, another is Bailed, two Scorpions in the woods are Bailed, and not much else happened other than some atrociously low rolls (seriously, out of ten to thirteen dice, I didn't get anything higher than a couple of fours - RNGeezus taketh away).
On the British half, the Harriers arrive again and go directly after the T-72s. Most of the rest of the Bailed Brits get back into their vehicles, minus a few exceptions, and everyone maneuvers to their advantage. The Challengers Dash into cover to meet the T-72s more head-on, and the Scimitars and Lynx maneuver to try and stem the approaching Unit of BMP Mech looking to envelope the far side Objective. On the near side Objective, the BMP mech infantry, on its own after the Recon had left, had all of their BMPs destroyed except for one Bail, and only five infantry stands survived out of the eight they started with. The other BMP Recon Unit is wiped off the board completely. The unblooded Mech Unit on the far side Objective becomes decidedly blooded, with two lost and two Bailed BMPs, but lucks out with no loss of infantry. The Shilkas catch some hate as well, losing two tracks and another Bailed. The T-72s try to drive off the Harriers with Defensive AA fire, but only manage to roll a lot of dice for no effect, and then lose three tracks to a Salvo.
 |
| Turn Two... FIGHT!! |
 |
| More carnage at the schwerpunkt. |
 |
| Mech infantry Dashing to enfold the flank. |
 |
| T-72s moving into cover. |
 |
| Bogged command track, and repositioned OP. |
 |
| Artillery looking nervously across the board. |
 |
| Challengers Dash forward and Harriers swooping in to lay down a Salvo. |
 |
| British maneuvering. |
 |
| More British maneuvers. |
 |
| "Uh, guys? I think they don't want us here..." |
 |
| Carnage at the near side Objective. |
 |
| Carnage at the far side Objective. |
 |
| Carnage in the mid field. |
 |
| Burning T-72s. Note that the Challengers Dashed to this position and cannot fire this turn. Uriah was trying to get them into position so they could fire without moving and get ROF 2. |
 |
| One last picture of the back field. |
TURN THREE - If there was a low point to the fight for me, it was Turn Two, as my dice were not wanting to cooperate and I lost a lot of vehicles. Turn Three wasn't much better. Again, no strike aircraft (what I'm not telling you is I keep forgetting to roll for them at the start of the Turn, and then remember just before the end, but still fail the roll). I manage to Remount a few vehicles and don't lose any more Units to failed Morale checks, but one of my three infantry Units remain Pinned (near side Objective). On the far side, all of the infantry dismounts and one Unit rushes towards the Objective, while the other sets up overwatch positions on the Objective. I manage to Blitz my Spandrels just a bit forward to get better Line of Sight on the Scorpions in the trees, and move the T72s back out of cover of the Challengers. The command BMP succeeds on their Cross Check to get into the woods (yay!) and then fails the Cross to get to the other side of the woods (boo!). Firing on the run, the forces on the far side manage to kill three of the four Scimitars near that Objective. Artillery shifts its Range In and drops rounds on the Scorpions in the tree line... to no effect, which is part of a theme as even with the lone remaining Shilka, the Spandrels, and all the Pinned infantry, the rest of the Scorpions remain at one destroyed and two Bailed, which I had inflicted last Turn, but I do get a Bail on one of the two remaining Strikers, so not a total waste. And yes, I purposefully Dashed the T72s where I did because I could not get a Side Armor shot with a Tactical move. Shooting at Challengers from the front with T-72Ms is an exercise in frustration - you have to Hit (4+ out in the open, 50%), then they have to roll a 1 for their Armor Save (17% for just that), and then you have to make Firepower (at least it's a 2+ there, 83% for that roll) (which, doing all of the fancy probability math, means there is a 7% chance of this happening, or about 7 times out of every 100 attempts... and I only have four shots to try my luck, by this point), all so you can Bail one of the Challengers. Not destroy, just to get a Bail. Save your shots and use Dash until you are in a position to get a flank shot.
Over to the Brits, Harriers come in once again, they Remount everything that is Bailed, but the last living Scimitar fails Morale and hightails it off the table. The Challengers move forward at Tactical to get shots on the remaining T-72s, and everything else shifts slightly to pour as much hate on the East Germans as possible. Also to the tank party in the back field come the Lynx TOW helos and the harriers. On the near side Objectvie, the infantry and remaining, lone Bailed BMP weather the storm and nothing much happens (RNGeezus taketh away). On the far side Objective, the BMPs that had been hiding behind the hill and then unmasked to wreak some havoc on the Scimitars are wiped out, as well as the Spandrels in the mid-field (RNGeezus giveth). Now that I think about it, I should have used Shoot 'n' Scoots to move the Spandrels into the trees they were next to instead of even further out of cover, though them spending the game Bogged at the edge of the trees would have been, well, frustrating and par for the course. A few infantry stands on the far side are also removed. The last moving Shilka is destroyed, leaving a Bailed teammate to see if they run or not next Turn. One of the Harriers succumbs to Defensive AA fire from the T-72s, but then the last harrier, both TOW Lynx, and the three Challengers pour on the fire, and of the remaining four T-72s, two are destroyed and one is Bailed. Like I said, pretty much these two Turns were the low point of my game.
 |
| Turn Three, FIGHT!! |
 |
| Not a lot happening here, but the East Germans are holding on and the Brits aren't giving up, either. |
 |
| Remember, in Counterattack, the Objectives do not go "live" until Turn Six, but this is when you need to start occupying them to set up your defense. |
 |
| Shifting fire. |
 |
| Run! Hide! |
 |
| Bogged again. |
 |
| Brits sending the Hate. |
 |
| So many burning BMPs. |
 |
| The fight at the far side Objective. |
 |
| The Shilkas are not having a good day. |
 |
| And neither are the T-72s. |
TURN FOUR - This is where the tide turns for the East Germans and they step from the back foot to the front foot, and prove that quantity has a quality all of its own. Still no strike aircraft, but we're used to that by now. Remounts and unPins for practically everyone else (still a straggler here and there, but more up and moving rather than down and out, which was nice), including the T-72s, which immediately moved to get Side Armor shots on the Challengers. The command track finally manages both a Blitz order and a Cross Check to get into position to help with the Challengers. The few BMPs left charge forward to deliver as much carnage as possible. The unPinned infantry streams around the far side Objective, investing it within a wall of bodies - this is MY Objective, and in two Turns when it goes "hot", you will have the devil's own time getting me off of it! The artillery once again fails to do anything to the Scorpions in the trees. At the near side Objective, one Striker destroyed and the last Bailed, three Scorpions in the last two Troops are Bailed as well, and one of the Marksmen are also Bailed. In the back field, the two SA-14 Gremlin stands manage to knock one of the Lynx out of the sky. And the big one, the T-72s kill two Challengers outright! Unfortunately, the third was behind the stand of trees and the command crew did not get a clear Line of Sight to it.
Over to the Brits. They do not get Harriers in for the first time this game, and fail their Morale check for the last Challenger, but do get most of their Bailed vehicles Remounted, including the last Striker which passes Morale. Which brought up the question of Units in the Formation, but both Scorpion Troops and the Strikers are core, so not to making Formation Morale Checks quite yet. Even with losing their big guns, the Brits manage to dish out a decent amount of pain - totally wiping out the Shilkas, who honestly did not do much for me all game; they removed enough of my infantry from one Mech Unit that I almost had to make some Morale checks for them, but do manage to Pin them; and they Bailed one of my last operational BMPs and one of my last 2 T-72s. But still, with the removal of the Challengers and the last Lynx not moving to get shots in on the T-72s, Uriah was not hopeful about his chances from here on out.
 |
| Turn Four, FIGHT!! |
 |
| Gotta get under that minimum range. And the burning Striker does give Cover. |
 |
| Bailed Brits around the near side Objective. |
 |
| Mech infantry going after the Objective. |
 |
| The last Shilka, Remounted and passed Morale, is pitching in. |
 |
| One burning Lynx and two burning Challengers, just warms the heart. |
 |
| "We finally made it... what do you mean there's nothing to shoot at?!" |
 |
| Yup, that last Shilka is burning, and one of the infantry stands got taken out by MG fire. |
 |
| Lots of carnage on this end, even with the lower ROF from the Marksmen that moved onto line. |
 |
| I'm telling you, Scorpions and Scimitars are as hard to get rid of as cockroaches! |
 |
| This took a lot of maneuvering to get to this point. |
TURN FIVE - Finally, the Fitters return to the fight! Finally, the Mech infantry Unit that had been Pinned since Turn One Rallies and jumps towards the Scorpions for an Assault! I don't Remount anything else, but the T-72s do pass Morale, so they're still in this fight, at least. The Fitters I bring on to help the Gremlins and the last running T-72 take out the final Lynx, which does go down in a hail of fire from three different directions. The two Units of Mech infantry on the far side Objective invest that Objective even further, and while I can't Dig In this turn (one Unit is still Pinned and the other moved), everything focuses on the Marksmen, which are a HUGE threat to infantry in the open, and destroy all three in an orgy of shoulder-fired rockets and cannon fire from the last BMP. Again, artillery is ineffective against the Scorpions, because this is a running theme. The infantry and their BMP transport on the near side Objective manage to Bail the last Striker, and two of the last Scorpions in the near Troop, and then go in for the Assault... which they fail, losing a stand, and falling back to be Pinned, yet again.
Over to Uriah. He wanted to throw in the towel at this point, but we were down to so few Units between us that the Turns were getting much shorter, and there was an outside chance he could pull this out still. It was looking pretty grim, but even being in a dominant position, I was teetering on the brink of failure. Just a few bad die rolls and I'd be making Formation Morale checks. So he jumped back in and made his best play. The last Harrier again fails to show up, not an auspicious start. The last Striker fails Remount and runs for the hills, which also doesn't help, as that was one of the three last core Units in the Formation. The Remounts also do not go well, leaving two Scorpions out of action, though that Troop passes Morale and stays in the fight. The only thing he can try is get all of his Scorpions out of the woods and on line to fire everything they have at the infantry around the far side Objective, as well as the three last BMPs on that side (two Bailed and one active... one of those Bails has been that way since Turn Two). Of course, leaving the woods, you have to pass Cross Checks, so he throws his best shot and for one Troop fails the Cross Here check, but still passes Cross and gets the last Scorpion out and on line. The other Troop passes Cross Here, but still Bogs with one of the two remaining Scorpions in that Troop (the last Scorpion didn't have to move, so didn't). With what he had available, he did manage to Pin the last two Units and remove a few stands, but not enough to force a Morale Check for either Unit. As we head into the final Turn, Turn Six, Uriah is not very optimistic about his chances.
 |
| Turn Five, FIGHT!! |
 |
| Carnage on the near side Objective. |
 |
| Burning Marksmen as the infantry swarms forward being supported by a BMP. |
 |
| The failed Assault on the near side Objective. |
 |
| To give you an idea of the far side Objective, here is some drone footage... not that they had drones as we think of them in 1985. |
 |
| Goodbye Lynx! Finally! |
 |
| But it only took the Fitters, the T-72s, and the Gremlins to do it. |
 |
| The Scorpions leave the woods. Well, those that can. |
TURN SIX - Again, no Fitters arrive this turn, but of course, everything is Danger Close and I couldn't use them on much, anyway. The T-72s fail Remount again and then fail Morale. Ah well, nice while it lasted. Out of three infantry Units, I unPin one and immediately Dig In on the far side Objective (though now I realize I shouldn't have moved their attached Gremlin team, mistake on my part, but no impact on the outcome). I do manage to Remount one of the BMPs near the far side Objective and so the two active BMPs on that side Tactically move forward to shield the infantry and the Objective and also fire at the Scorpions coming out of the woods. Meanwhile, the last BMP that was facing down the Strikers, Dashes over to the near side Objective so my opponent has to pry me off both Objectives, not just the far side. Now that I think about it, I may have been wrong and Transports without any infantry in them can't hold Objectives. If that is true, it still didn't affect the game, other than put more stress on Uriah. I manage to destroy three Scorpions, leaving one Troop with one Bogged Scorpion and the other Troop with two Bailed Scorpions.
At this point, Uriah concedes the game, and I have to agree with that decision. With me sitting on both Objectives (if I was wrong before and held only one Objective, he still could not generate enough shots to pull my infantry away to get me off the Objective, so a moot point, there) and only one active and two Bailed vehicles left, it does not look like he would have enough luck to get me off of one Objective much less both of them, and that's after making all the rolls (Remounts and Morale) needed to keep his Formation on the table.
 |
| Turn Six, Fight...? |
 |
| The T-72s have left the field. |
 |
| East Germans in control of both Objectives. |
 |
| Too much to work through to get the Germans off either Objective. |
 |
| The East German infantry and scampered vehicle graveyard. |
DENOUEMENT - I have already talked about what we learned in the game, and like I said earlier, this was very close, a lot closer than many of our recent games. Low points games, around the 50 point mark, favor WarPact and the lower point cost NATO lists, while 125 points and above tend to favor the non-horde lists as there is enough of the better equipment to negate much of the "quantity over quality" benefits. Right around 75 and 100 point lists seems to be the sweet spot where you can still be very competitive and neither side nor specific lists seems to have much of an advantage. I definitely had an advantage with more Units, but Uriah could easily have traded in his Challengers for another Medium Recce Squadron and ruined my day entirely. "You have HOW MANY SCORPIONS?!?!?!" Trust me, the number of times I tried to stomp on them cockroaches and they just WOULD NOT DIE, they really are the bane of my existence when I face him. If you want to play Brits, buy Scorpions and Scimitars. How many? ALL OF THEM!! But I was really worried back in Turns Two and Three, I thought his Challengers and strike aircraft would roll me all the way up and I didn't bring enough "oomph!" to take care of either of them. Tanks like the Challenger are the unstoppable force, you can only sidestep them and hit them from the flanks, as T-72s just aren't in their league. We are both getting better about remembering to use our Movement Commands, but I did fail to use any after about halfway through the game, and those inches really could have helped when I was closing in on the Objectives. Also, Uriah played his planes and helos far better than I did and kept them well outside the range of my gun AA tracks. Only when I finally got out the Gremlins with almost 2.5 times the range of the Shilkas did I get any results.
Something else I just realized, we have only been using the standard Missions, not the Extended Missions. Okay, next game, we are going for the Extended Missions table.
I think I have covered everything, in my usual rambling, wandering style, and I will end this BatRep here. Have a good month, and if you can, go play some games with your family and friends.


No comments:
Post a Comment