Tuesday, October 19, 2021

TY 6mm Lessons Learned 8

Welcome once again to another Battle Report for World War 3: Team Yankee (TY) in 6mm. Our Escalation League had another game, and this was an exciting one. One of our players has been dreaming of throwing as many tiny tanks onto the table at one time, and for some reason has decided a 200 point list of Egyptian T-34/85s from Fate of a Nation (FoaN) is the way to go. He has been acquiring many of them through eBay auctions and 3d printing many of them, and while he has not quite made it all the way to the full 200 point list, he did have enough to make a 75 point list (which is where we are still at with our League) and was itching to put many, MANY tiny tanks onto the field. Yes, we are not playing FoaN (yet) but he was okay with paying more for his T-34/85s - in FoaN, these tanks cost only a point apiece, but translated to TY, these should cost even less per vehicle. Not that it hindered him any. Even knowing what I was facing, I brought out my American Armored Cavalry force instead of my M60 Patton Armored Combat Team. TL;DR: I should have brought the greater numbers with the Pattons, but I did not because I wanted to play with the new Bradleys I had recently purchased, and as a result I got overwhelmed. Admittedly, I would have probably been overwhelmed even with the Pattons, but I would have had more guns to bring to the dance. 

The forces: my US Armored Cavalry was led by a single M1 Abrams, had five M3 Bradley Scout Sections, a four track M1 Abrams Tank Platoon, two AH-1 Cobras (just TOW, not TOW-2), and two VADs from Divisional Support. Facing them, Brandon's T-34/85 horde: five T-54s, four BRDM-2 Scouts, and (I literally am counting them in the picture to make sure I have this right) 56 T-34/85s. Or 55. Or 54. I seriously have three pictures showing all of the Egyptian Force and my count is different in all three pictures. I think it was supposed to be 54, and that is the last count from the Deployed picture, so I will say 54 T-34/85s.

We set up a nice big field of battle, and Americans picked Defend (d'uh) and Egyptians picked Attack, resulting in No Retreat from the Mission Pack. Okay, I only have to hold off the horde for six Turns, I can make this happen... who am I kidding? Even at less than a point apiece and not being able to penetrate my Abrams except on a side shot (hit on 4+, AT 12 vs Side Armor 8, Firepower 3+ means he will make half of his shots, I will make Armor Save on half of those shots, and he will pass a little over half of the Firepower Checks, meaning every 10 tank company is good for, on average, a Bail and a Destroy every Turn... if all 10 tanks make it to the side of the Abrams. But I only have five Abrams, one Force CO and four in a platoon. I'm making Unit Morale checks on the 2nd Turn after contact and Force Morale checks the Turn after. But, at this point in the match, I cannot see that I have no chance with this force and I fully have the blinders on to my fate. 

A quick note about the setup - No Retreat calls for you to play down the long axis of the table, but we do not have enough terrain at the moment, and the small table we had at our FLGS has one short end up against the wall. Not impossible to work around, but annoying. So instead of playing it as directed, we did not fill the table side to side with terrain, but instead played with a little stand off on each side, a Gentlemen's No Go Zone as it were, and played across the short axis.

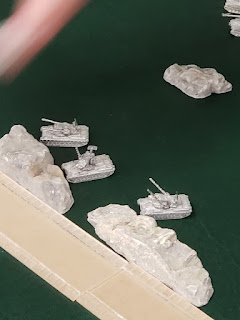
The brave American Force... as the Brits would say, "silly sods".

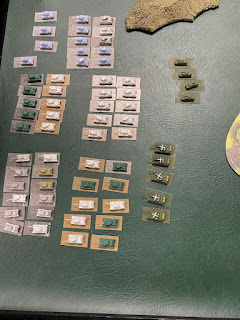
The Egyptian Force. That is a lot of tracks.

A hell of a lot of tracks.

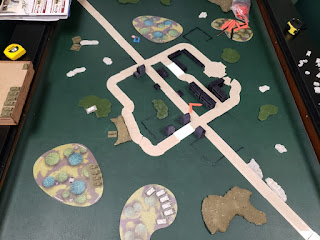
The field of battle. Yes, I still need to paint the roads.. and the buildings.. and make more hills... and some tree templates... {sigh}

Deployment is pretty much what you expect - the Americans split up the Bradleys and put them in overwatch over each Objective, the Force Commander in a backstop position in the rear, and Minefields in each of the three most likely approaches. The Egyptians set up across the back of their side of the board, with a stronger presence on their right flank with both the T-54s and the BDRMs leading from the front of that flank. One thing that I just realized - the Bradley Scout Sections are five Sections of two Bradleys apiece, not five Bradleys in two Sections. I should have Deployed them six Brads to the American right and four to the left, but I did not. I do not think that making my Deployment correct would have changed the eventual outcome of this fight, but it still is bothering me.

A very thin line of Defenders.

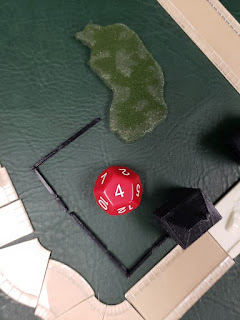
The Force CO keeps looking to the rear. Will Reserves come, or is it time to head for the hinterlands?

The Horde, er, I mean, Egyptians.

{insert something witty here} That is still a lot of tracks.

FIRST TURN Surprise, surprise, the Egyptians come rushing forward like a tsunami and manage to destroy a Bradley on the American right. In response, the Americans Bail one T-34/85 in the center-right, and destroy two and Bail two T-54s on the American left. Yes, the T-54s worried me, as they are far more dangerous than the T-34/85s, so they get focused down for a bit. The Americans get their Cobra gunships to come on, which loitered near the Force CO and a building they used for cover for most of the game. If you have not figured it out, the American strategy is to last until Turn Six, killing as many of the opponents as they came streaming in. The Egyptian strategy is to surround the Americans and get side shots into the Abrams or get a win by Capturing an Objective. Again, I forget my Movement Orders, as I should have placed my Bradleys further back into the forest and then Blitzed them to the edge to get off TOW shots instead of exposing them to enemy fire from the start. Would have kept at least one more Bradley in the fight into the next Turn.

First exchanges.

Yes, I need to magnetize up my flight stands... and helos.

T-54s burning bright.

Bradley already out on the American right.

SECOND TURN More of the same - the Egyptian steamroller keeps grinding forward and the Americans try to stave it off. The Bradleys on the American right almost all succumb to incoming fire, with two more destroyed and one Bailed. In response, the T-34/85s in front of these Bradleys lose one and another gets Bailed for two total. The T-54s lose another and the final is Bailed, putting that Unit into Morale Check territory. Another company of T-34/85s catches hell and loses two as well. This seems impressive, but that is only three tracks destroyed with 49 still in the fight, so it is not enough damage to make a huge difference.

Bradleys under attack.

They are catching so much hell.

This is a target rich environment.

T-34/85s catching some return fire.

More burning T-34/85s.

THIRD TURN The T-34/85s continue to grind forward, getting into position on the American right Objective and closer on the left one as well. The last of the Bradleys on the right succumbs to enemy fire, and I have to bring the VADs Unit out of Ambush to keep a Defending unit within range of that Objective or lose the game. The VADs cannot do anything to the T-34/85s from the front anyway - I really should have pulled them from the list and put something else in that could do more than just sit an Objective, but at only three points, I am unsure what I could have put in their place that would have been effective - so they Dig In, hoping to weather the coming storm. The T-54s finally succumb, to a failed Morale Check as the last track turns and heads back to cross the Mediterranean (no, we never came up with a good story for why the Egyptians from the 1960s ended up in mid-80s Eastern Europe, we just felt the game was a fun one). In retaliation, the Bradleys on the American left start taking casualties of their own, as the T-34/85s to their immediate front finally do a Tactical Move and start firing. The Americans lose a Cobra to Defensive AA MG fire, but do get their Reserve Unit of M1 Abrams onto the board, and they immediately begin removing T-34/85s from the field, mostly the ones around the Objective on the American right.

T-34/85s on the Objective.

An intense standoff.

The Bradleys all perish, and the VADs have to come out from Ambush.

The T-34/85s catch fire from the Abrams fresh in from Reserves and almost all perish.

The T-34/85s on the American left swarm forward. Note the BDRMs in the back. Brandon did not need them to destroy American vehicles and did not want to expose them to my fire and merely lose another Unit to little effect.

FOURTH TURN Bit of a swing moment for the Egyptians - the T-34/85 company near the right Objective fails enough Remounts to call for a Morale Check and leaves, the second Egyptian Unit to do so, making this a Major Victory instead of a Stunning Victory for them. In response, the Egyptians wipe out the remaining Bradleys on the left, swarm the Objective on the American left, move towards the Objective on the right, and destroy the VADs as well. The Americans, to stay in the game, move all of the Abrams to their front left to peel the T-34/85s off of that Objective, and manage to Bail or Destroy all but two tanks in that company. 

American Force Commander - "It's okay, we got this!"

"That's a lot of tanks bearing down on us!"

"There go another two Bradleys!"

"Nope, that's all of them gone!"

"And the Vulcans!"

"Okay men, let's take it to them!"

FIFTH TURN The Egyptians continued to press the attack, even moving the company of T-34/85s at the very back that has stood stock still until now. They maneuver close to the Force Commander and attempt shots into Side Armor, but nothing gets through. With the Objective on their right and no friendly forces nearby, the remaining Cobra rushes to try and peel the Egyptians away from it and gets shot down by Defensive AA Fire. The Force Commander fires up through the spread out T-34/85 Unit to get at the tanks around the right Objective, but does not manage to destroy or Bail any of the tanks there.

At this point, I conceded the game to the inevitable. I could have maneuvered the Abrams platoon back to the other side of the road and blown up enough of the T-34/85s around the right Objective to stay in the game another Turn, but it was inevitable at this point - with the Force Commander and the Abrams platoon, I just did not have enough Units to keep both Objectives from being Captured. The T-34/85s could only damage the American tracks from the sides, which they would have had to expose just to sit on both Objectives. I had a full company of ten T-34/85s in between me and the right Objective, and another company bearing down on the left, another on the right, and the last one barreling down the middle. More thoughts on the game after the pretty pictures.

Even more tanks swarm forward.

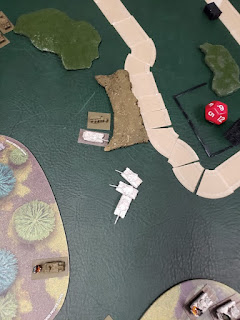
The Cobra was heading vaguely in this direction when it succumbed to AA fire, so I decided this was its final resting place.

I lost this game choosing my Force. Not even in Deployment - when I went with the Cavalry Force just so I could play with the new Bradleys I had gotten from GHQ (which I did not use, instead using the pretty ones Brandon already had painted up, and my new ones are not on bases or base coated or painted yet) instead of my M60 Patton Armored Combat Team. Eleven Pattons (one CO, four tank platoon, two three-tank platoons), a M901 platoon (two M901s), two M113 Scout Sections (two more M901s, two M113s), full Mech platoon (four M113s, four M249 teams, four M47 Dragon teams), two A-10 Warthogs, and four VADs. For Deployment, I would have been able to plant the infantry in the trees just behind the right Objective; they may not have been able to destroy many T-34/85s (Dragons only from the front, LAWs only in Side Armor shots), but eight stands of infantry are hard to dig out. Well, maybe not, seeing as a ten T-34/85 tank company can throw 50 (yes, fifty) MG dice Halted or 40 Moving. That is a lot of dice. Anyway, they are a decent speed bump and good at sitting on Objectives and backing up other units. Yes, I would Deploy the infantry and leave the M113s in the rear, might have to bring them up at some point, but I doubt it in this game. Doubling the number of MBTs would have vastly improved my chances, as compared to the T-34/85s, the Pattons are almost as nasty as the Abrams for them (the T-34s) to tangle with. The M-901s are nasty as well, pumping out TOW missiles that the T-34s (and T-54s) just cannot stand up to. The M113s in those Scout Sections are pretty useless, but so are the VADs against this particular foe, and I will get to that in a moment. The Warthogs are nasty and would probably do more damage than the Cobras. All in all, this Force gives me a greater chance of winning against this horde list, but with the Abrams led Cav Force... no, I had too slim a margin of error in this match.

Brandon, on the other side of the table from me, also learned something from this game - horde armies, aside from those with movement trays, are a pain in the arse. Every Turn, moving 54 tanks (plus other Units) gets old really quick, and wears your arms out. 

Bonus Meta Time! Taking the above M60 Patton Force, how would I "improve" this Force? I like the M901s in the Scout Sections, but the M113s in those same Sections not so much. And the VADs are great... against infantry and aircraft. And very lightly armored vehicles. Take those three Units out and replace them, from cross Force Support (which does lower their usefulness in Force Morale checks, but does at least alleviate my guilt when I allow them to die to enemy fire) put in a four vehicle TOW-2 HMMWV Fire Support Platoon and a M3 Bradley Scout Section consisting of two Bradleys. I lose two M901s (and others), but I gain six vehicles firing TOW-2s and two vehicles with 25mm Bushmasters. Yes, the HMMWVs are super thin skinned, but so are the M901s when facing tank cannons, though the HMMWVs do not even have the AA MG that the M901s do. Yes, this optimizes the force, but would I use it all the time against any list? No, just this one particular force, which is why I labelled it a Meta list - only if I knew beforehand exactly what I was facing would I bring out this particular list. Otherwise, I like having the flexibility to face a more varied Force. Or in a time limited tournament - I still have plenty of maneuverability, but just enough infantry to hold an Objective until the end of the game.

Okay, enough blathering. Lesson Learned from this game... do not fight the 1970s Egyptians in Eastern Europe in the 1980s. I guess. Have fun, folks, and we hope you get some games in with teeny tiny tanks!

Monday, October 11, 2021

TY 6mm Lessons Learned 7

 Another post, another Battle Report, and a change of scenery! Our little Escalation League rented a table at the local gaming store and threw down in mid-September. My East German T-72M Bataillon (yes, that is how the Germans spell it and not me mistyping Battalion) took on Uriah's British Chieftain Armoured Squadron (again, Brits and their extra "u" fetish). TL;DR: I scored a Stunning Victory. 

I had invested in more street pieces from GC Minis, so we used all of them. I really need to paint up the street pieces and the buildings I 3d printed - for the modern wargamer, a 3d printer is a very useful tool, a "gift that keeps on giving", even the inexpensive beginner printers like my Creality Ender 3 - but painting is, honestly, my least favorite aspect of the hobby. Both sides picked Attack, Counterattack was the Mission rolled, and the Brits rolled higher to become the Attackers. The Objectives were placed, and while I thought I had a superior placement for my Objective, it was not until the end of the game that I realized that terrain, like hills, do not block Holding Objectives, and so the Brits had a chance to Hold that Objective and be in total Cover from my forces on the other side of the hill. 

They have very nice gaming tables at our FLGS, giving us a bigger field of battle than my poor dining room table. 

I was surprised by Uriah picking Attack.

We like busy battlefields in our little Escalation League.

The Volks Armee forces.

Death or Glory Boys.

The WarPact and NATO Objectives have been placed.

The WarPact Objective.

The British Objective.

In Deployment, I set up what I could with the majority facing the table quarter the Brits would be deploying from. Rechecking my math, I see that I should have left the BMP Scout Section in Reserves along with everything else to meet the 40% requirement. I deployed one Kompanie of T-72Ms far forward, knowing they may not survive to return fire, seeing as the Chieftains were coming, but wanting to draw all their attention to that side of the Deployment Area. The Shilkas... I do love all my AA tracked vehicles (Shilkas and VADs, mostly), but like artillery, I am becoming disillusioned with them. I think out of the four other players in our Escalation League, only one of them has built any infantry stands and he uses them sparingly. I may start pulling my AA assets out for other stuff. That, however, is a meta to ponder on another day. For now, they sit in support of the T-72Ms, warding off Uriah's Recce screen from simply rushing right to the other side of the hill and begin to capture that nearby Objective. The Force Commander sits by their lonesome, ready to support the far Objective (again, should not have Deployed the BMPs, the Force CO and the Shilkas should be on the NATO Objective from the start), and the BMPs sit in overwatch on the far NATO Objective. The Brits deploy with their Recce screen poised to sweep down on the NATO Objective, their artillery in the center rear, Swingfires in support position, Marksmen supporting the Chieftains, and the Chieftains right in the teeth of the T-72M Kompanie. 

East German Deployment.

T-72Ms far forward with Shilkas in support.

East German Force CO ready to swing between the two Objectives.

BMPs on overwatch of the NATO Objective.

Brits trickling into the Area of Operations.

Scorpion Recce section.

M109s (four of them, Lesson Learned), and Marksmen.

Scorpions ready to rush the far Objective, and speedbump any East Germans coming in from Reserve (that table quarter was the Reserve Deployment Area).

Close up of the Marksmen. Like I was pondering earlier, no Infantry, so these tracks throw a lot of dice, but are not really effective against other vehicles.

The Chieftains are on the field.

Showdown at point blank range.

"Think they've seen us?" "Yes, I think they have."

The Panzer Kompanie is feeling a mite lonely, that is a lot of Chieftains.

East German Reserves - one Panzer Kompanie and a battery of Carnations, plus their OP. The other Panzer Kompanie is in Ambush. 

TURN ONE The Scorpion Recce rushes towards the NATO Objective, the Swingfires spend a turn Digging In, the Chieftains wipe out an entire Kompanie saving me from having to make any Morale Checks, and the artillery manages to destroy a Bailed Out Shilka. I am failing to remember who Bailed the Shilka in the first place - I have slept since then. That is my excuse and I am sticking to it. I knew I would lose that Panzer Kompanie, but was hoping they would at least last until the next Turn. Ah well, the Chieftains were not moving towards the WarPact Objective. The Panzer Kompanie in Ambush comes out to play, ready to tangle with the Chieftains. The Shilkas maneuver out of the woods, kind of. I cannot remember exactly what I was thinking of doing with the Shilkas at this point, maybe trying to swing around the flank and causing some havoc. I should have been moving them to either support the Force Commander or the BMPs. I am very undecided with them during this game, and right or wrong, I really should have been more decisive with them. The BMPs head out and engage the Scorpion Troop, destroying two. The East German Force CO moves to cover the WarPact Objective. The Ambushing Panzers manage to brew up two of the Chieftains, greatly improving the outlook on the East German right flank. 

Turn One.

Scorpions doing what CVR(T)s do best, moving quickly across the battlefield.

The tracked Recce vehicles are a great option for the Brits.

Swingfires have Gone to Ground.

The first round of firing only sees two of the T-72Ms succumbing.

Unfortunately, the other four quickly follow. The Chieftains have a nasty 120mm cannon.

"Join the military and go to war, they said, you'll have fun, they said..."

Shilkas catching fire.

"INCOMING!"

Ambush!

Shilkas derping about. Cross Checks, the bane of my existence.

The BMP Scouts sally forth to engage the Scorpions.

The Force CO was bored so he let the driver move the tank over to the Objective.

The Scorpions catch some hate.

The Scouts facing off with the Recce.

The ambushers land some shots.

Failed Armor Saves.

And the Brits lose some much needed Chieftains.

TURN TWO The remaining Chieftain from the Armour Troop fails Morale and heads for the hinterlands. Some of the Chieftains move into cover in the town, while the artillery takes out their wrath on the BMPs, to little effect. On the East German portion of the Turn, Reserves were rolled and a Kompanie of T-72Ms join the party. The remaining Scorpions have Dug In, making it harder for the East Germans to hit them, but the WarPact forces still manage to destroy one Scorpion. I am still not certain what to do with the Shilkas and they wander vaguely towards the other side of the battlefield. 

The Turn Die has spoken.

One less Chieftain Troop on the field.

Chieftains maneuvering.

Yeah, that will hit all of those BMPs.

Reserves arrive on table.

The BMPs move out from under the artillery barrage.

Herp-a-derp-a-derp...

Facing a Morale Check real soon.

TURN THREE The Scorpions fail that Morale Check. Apparently, during the last turn, I had moved not only the Shilkas, but also the Panzer Kompanie had moved out of the trees to better face the maneuvering Chieftains. The Chieftains Bailed one and destroyed two. East Germans successfully rolled for more Reserves, and the Carnations enter the field. The remaining Panzers - here is the only time I am grateful for a failed Cross Check, the Chieftains could not completely wipe out my T-72Ms with the one Bogged tank out of sight in the trees - maneuver, putting the trees between them and the Chieftains while moving towards the flank. The Shilkas move out towards the NATO Objective, where I think I was using them to cover that Objective in case... I do not quite remember. Maybe I was worried the Swingfires or the Marksmen might move to try and take it while I was dealing with the Chieftains on the other flank. Whatever it was, I was still not clear on what I wanted them to be doing at this point in the game.

Turn Three. SHOW ME WHAT YOU GOT!!

The last Scorpion decides life is swell and "nope"s out of there.

Blitz move to get Halted Rate of Fire.

More burning T-72Ms, surprise surprise.

Six shots, two destroys and a Bail. Almost exactly average result.

And the roll for Reserves is...

Here comes the artillery.

The Bail Remounts, and the remaining Kompanie decides maneuvering into cover is the better part of valor.

The Shilkas derping off to no one knows where.

Uh, guys? Little help here!

TURN FOUR The Marksmen finally move out towards their left flank, and the Swingfires follow behind the Chieftains, hoping to get set up this Turn for a shot next Turn. The British Force Commander had apparently moved off camera towards the NATO Objective, either to threaten it or to block anyone on that flank from interfering with the forces headed for the WarPact Objective. The artillery OP makes a dash and tries to get a protected viewing spot to start calling in some artillery fire on the Brits. Meanwhile, the newly arrived T-72M Kompanie heads towards the WarPact Objective to deny it to all and sundry, while the BMP Scout element starts swinging back to head over to the NATO Objective and help out there. I am still not clear on what I wanted to do with the Shilkas and they keep heading away from where they could actually do something, like sitting on the WarPact Objective and catch incoming fire instead of anything else that is useful in this fight. The T-72Ms, having hidden out on the other side of the forest they started in, swing back to the other side in preparation to take shots at the Chieftains bearing down on their Force CO next Turn. I probably should have come around the other side of the forest on this Turn and fired at the Swingfires, staying out of the line of fire from the Chieftains (or at least made them maneuver to get shots), and then maneuvered next Turn to fire at the Chieftains. As it was, spoiler alert, these T-72Ms did not shoot at anyone this Turn and still get shot at by the Chieftains next Turn anyway.

Turn Four. Remember, the Brits have to capture something by Turn Six.

The Marksmen finally move out.

The Swingfires also move out.

East German OP and the British Force CO.

T-72Ms moving into the woods.

BMPs moving with purpose, Shilkas not so much.

T-72Ms swing back around.

I foresee some shooting happening very soon.

The state of the EG left flank.

TURN FIVE I just remembered that our Attacker, Uriah of the British Empire (trumpets flourish), picked to roll for time of day and got Dusk. I think it may have been Turn Three or Four when actual night fell, but we have not had any firing in the night until now. And that may have been why I did not swing out my T-72Ms to shoot at the Swingfires, as I doubt I would have been able to roll high enough to actually be able to see them, what with the crappy Infra-Red (IR) vision devices the East Germans had. The Chieftains moved forward, got their night vision roll high enough to see the Panzer Kompanie to their left front, and manage to Bail one of the tanks, which immediately Remounts. The T-72Ms return fire to no effect on anyone. The Shilkas finally get some purpose as their long lost fellow who had been stuck at the edge of the forest for so long rejoins the rest of the Zug, and they move back towards the WarPact Objective. Finally. {sigh} The BMP Scouts continue to move towards the schwerpunkt, while the final T-72M Kompanie gets half of the Unit stuck on the treeline (Cross Checks do not like me).

Time is ticking away.

Chieftains moving up.

Bailed T-72M.

They fired at night, that is what the fire marker is for.

Shilkas finally pull their heads out of their fourth point of contact.

And I hate Cross Checks in return.

The BMPs moving right along.

TURN SIX Getting down to the end now. The Swingfires manage to Bail three T-72Ms, while the Chieftains turn their cannon on the East German Force Commander and erase that tank off the battlefield. The Marksmen keep creeping forward on the British far left. Miracle of miracles, all of the T-72Ms Remount, and manage to Bail one and destroy another Chieftain, putting them further away from the Objective. The Shilkas finally earn their keep, and move to the Objective, denying it to the British. And the BMPs move up behind them. I could have tried shooting with their cannon at the last Chieftain, into Side Armor no less, but I did not think of it at that at the time. 

Note the dot, that is six and not nine.

You shoot at night and get shot in return.

Almost a total wipeout. I could have failed all my Remounts and then a Morale Check and this Unit would have been gone. Sometimes the dice work for you, but do not count on it.

The Chieftains performing some tight maneuvers.

The Marksmen late to the party.

Those are not even into Side Armor, but still no way that poor, lone T-72M was going to survive that barrage.

A miracle, all tanks Remount.

I still cannot get all of these Panzers together. 

The Shilkas sitting on the Objective while being backstopped by the BMPs.

The decisive action (spoiler warning).

TURN SEVEN As The Doors once sang, "This is the End, my only friend, the End". Uriah fails to Remount the Bailed Chieftain, and then fails the Unit Morale Check. As we were past the sixth Turn and there are no British Units close enough to Contest either Objective, this is where our game ended, with a Stunning Victory for the East Germans. Hang around, armchair quarterbacking to commence after the pretty pictures.

Lucky Number Seven.

Okay, just got to pass at least one of two checks...

...and failed both.

This is the part where I try to sound like I know what I am talking about and say what I could do better, and where my opponent failed or succeeded. I am definitely not the second coming of Rommel, Patton, or any other great tactician you care to name, I am merely a former POG (people other than grunts) of the US Army, so take the following with a deer lick's worth of a grain of salt.

With where the Deployment Areas are at in Counterattack, and where my Reserves were coming in, I should have kept just the two Panzer Kompanies further back in the field in overwatch over the WarPact Objective so they could not be demolished at the outset, and put everything else (Force Commander and Shilkas, because remember that I should not have had the BMPs at Deployment) staged to race over and contest the NATO Objective. That was my mistake, especially as Defender and having to Deploy my Force before Uriah did revealed where I thought the schwerpunkt would occur. When your opponent shows you his strength, do not charge head first into it. Admittedly, I did have one Panzer Kompanie in Ambush, so it was not quite that obvious. If Uriah had split his forces, say the two Troops of Chieftains in one half and everything else (Force Commander, Swingfires, Marksmen, M109s, and Scorpions) in the other half, and driven one at the NATO Objective and the other at the WarPact Objective from Turn One, I would have had a far rougher time of it. I would have had to worry about two Objectives, where in reality I never really worried much about the NATO Objective once the Scorpions were done, because nothing else moved in that direction. Yes, my Reserves come in close to that Objective, but - and I have to stop here, I think Uriah placed his Objective very well, and I needed to place mine better - having a sizeable portion of his force moving that way would have put a lot of pressure on me to at least respond to the threat, and Reserves, even Immediate ones, are not guaranteed in Team Yankee. He also needed to get to either of the Objectives sooner. This was the issue I had a few games back, against Uriah no less - when you have a time limit, you have to push those Objectives earlier in the game than Turn Five or Six. 

Other things I was thinking of while typing this up is that I need to keep my T-72Ms deeper into the woods. Since they are Moving and Halted RoF one, keep them further back so they cannot be shot at, then move them up to fire and then attempt Shoot & Scoot to move them back to safety. As the Rates of Fire are both the same, you might as well keep them in cover as long as possible and move to engage at the last moment, as you are not losing anything by moving and shooting as opposed to not moving and shooting. With Units like Swingfires that have Halted RoF one and no Moving RoF, move them into contact but keep them in cover, and then use Blitz to get them out for the shot. Or if they're already out of cover, make the shot and attempt Shoot & Scoot. Cross Here - I had at least two Units in this fight that I could have used Cross Here as they were basically out of combat, and I did not use Cross Here and they both Bogged for several Turns. I keep forgetting to use those Movement Orders. 

That wraps things up for this BatRep, have fun and go get some games in!