Another month and another Escalation League Game Day! Back on the 18th of June, my fellow enthusiasts showed up at my place and we threw down, 50 points of East Germany's finest, a T72 Panzer Bataillon, versus 50 points of Britain's own Death or Glory Boys, a Chieftain Armoured Squadron, in Bridgehead. TL;DR - Uriah's Brits came out on top over my East Germans, Minor Victory, 6 to 3. All right, you all know the rules - blue team ready? red team, you ready? LET'S GET IT ON!
Note - Brandon, our other founding member, was present and did not bring a project to work on, so he took lots, LOTS of pictures out of boredom. Enjoy!
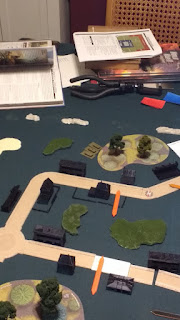
One of our standard setups - lots of terrain, buildings, roads, trees, hills, we like our fights tight and furious. We have added some rocks we found at Hobby Lobby, and some hills we made out of styrofoam, and put some 15mm scale trees onto our 15mm Tanks tree templates. Uriah, playing his NATO Brits, picked Defend, and I, playing my East Germans, picked Attack, resulting in Bridgehead from the Missions pack. I brought out my T72M Panzer Bataillon - an HQ, two Kompanies of T72s (6 in one, 5 in the other), a section of four Shilkas, a section of three BMP-1s as a scout element, and three Carnations for artillery. Uriah's Chieftain Armoured Squadron consisted of an HQ Chieftain, two troops of two Chieftains, a pair of Swingfires, four Scorpions in a Recce troop, a pair of Tracked Rapiers, and a trio of M109s, those last from Divisional Support (which will almost matter in just a bit). I think this is a strength of the East German force, as everything in my list is inherent to the formation and nothing is from Divisional Support. If I have my Formation Commander and any other Unit, even the Shilkas or the Carnations, my Formation is in Good Spirits. It did not help me much during this game, but hope springs eternal.
 |
| The field of battle. |
 |
| The cards are drawn. |
 |
| Our terrain is improving. Slowly, but progress is being made. |
 |
| The objectives, which got moved after this picture. |
 |
| The East German Formation (on the left, the right is the rest of my VolksArmee force waiting for their time on the table). |
 |
| The Brits, gathered in their might. |
 |
| British reserves. |
 |
| British deployment, with the objectives in their final position. |
 |
| East Germans begin appearing on the field. |
 |
| One Kompanie of T72s and a section of BMP-1 scouts. |
 |
| The totality of the WarPact deployment, strong side left. |
 |
| Get ready for Mad Dog Left. |
 |
Mission rules. This will be important in six turns, but for now, make sure you read ALL of the Mission rules. Trust me.
|
Turn One - the Shilkas head right to threaten that flank; the scouts and the larger Panzer Kompanie head up to the next bits of cover and start working on the Swingfires; the smaller Panzer Kompanie follow behind and get ready to cross into the woods; one of the Swingfires dies to low velocity cannon fire; the Force Commander, off screen, sneaks up and takes cover, ready to throw weight of fire if needed; and I tried to shoot at the Formation Commander, and missed. The remaining Swingfire fails morale and scoots over the horizon; the Scorpions come out of ambush, with the BMP-1s right in their sights; two BMP-1s succumb to low velocity cannon fire (damn you, low velocity cannon fire!); the Formation Commander returns fire and actually connects, bailing a T72.
 |
| Shilkas move. |
 |
| Recon element moves. |
 |
| Panzer Kompanie makes their Cross Checks, six rolls in a row. This will not last. |
 |
| Mad Dog Left. |
 |
| The hand descends, a destroyed marker in its grasp. |
 |
| Burn, you scary ATGM carrier. |
 |
| It is a long shot to the Formation Commander, but you miss 100% of the shots you do not take. |
 |
| Ambush! Scorpions on the hill! |
 |
| Making it rain (hot lead). |
 |
| Those BMPs were gonna get shelled by the M109s this turn anyway. |
 |
| Target right! Sabot up! Send it! |
 |
| Yep, want to rush that gap, hate that minefield. Uriah's minefield placement on both sides hampered my rushes from both sides. |
Turn Two - the Shilkas pushed through the woods... mostly, as half of them fail their Cross Checks on the way out of the woods; the lone, remaining BMP passes Morale and vows vengeance (on the Brits in general), and charge into the woods to start taking shots at the Rapiers; the Panzers (mostly) stream through the woods to follow the BMP; the Force Commander moves up to start shooting at the Scorpions; the T72s shoot and blow up the British Force Commander; the Volks Armee Force Commander and the T72s in the treeline blow up two of the Scorpions on the hill; and the BMP in the woods takes out one of the Tracked Rapiers.
It is at this point, Bill (me) realizes he *ahem*, "messed" up. Literally as I am typing this, I rechecked the rules and we played this completely wrong. At this point, right at the beginning of Uriah's half of Turn Two, I had won the game. The Starting Step goes like this - Remount Bailed Tanks, Rally Pinned Units, Check Unit Morale, Check Formation Morale, Reveal Ambushes, Roll for Reserves, Roll for Strike Aircraft, and Remove Friendly Smoke. As soon as we got to Check Formation Morale, I won - he started the game with three Units from his Formation list, the Squadron Commander, the Swingfires, and the Scorpions, as the Rapiers and the M109s are from Divisional Support. Having run the Swingfires off the board due to failed Morale in Turn One, no Reserves coming in Turn One, and then losing the Commander in Turn Two, Uriah was then down to only his Scorpions. Formation Morale says you have to have at least two Units for your Formation to be in Good Spirits, and Divisional Support Units do not count. The Brits are not in Good Spirits, they quit the field before Uriah can Roll for Reserves, his only hope.
But we did not play it that way. We did not look at the book, assuring ourselves (me included), that Uriah was lucky he got to Roll for Reserves before Checking Formation Morale. And as I realize my mistake now, almost two weeks later, I am not mad at Uriah, but at myself for not checking the rules. That is the lesson for this Battle Report, folks - CHECK THE RULES. Read the mission rules thoroughly, check the rules in the book, unless you have played the game so much that you dream turn order and movement orders and whether you can fire through your own friendlies in this edition of the rules or not. Otherwise, even as simplified as World War 3: Team Yankee has gotten from previous editions of Battlefront's other offerings, like Flames of War version 2 or even 3, you will mess something up. And I did. This game, as I have already spoiled as a Minor Victory, 6-3, for Uriah, should have been a Stunning Victory, 8-1, for me. *sigh*
As we played it, though, Uriah Rolls for Reserves (two dice, Deep Scattered Immediate Reserves) and gets one Unit of Chieftains, and rolls for their starting location, which is the table edge directly where it needed to be, in the flank of my hard charging T72s; the Scorpions roll off the hill and go looking for tasty Shilka meat, Bailing one and destroying another, and then Shoot and Scoot into cover behind another hill; and the Chieftains charge in and Bail a T72 *sad trombone*.
 |
| Failed Cross Checks. Feh. And yes, we have a cat in the house, can you tell? |
 |
| Moving into contact. |
 |
| BMP passes Morale and heads to contact, for REVENGE!! |
 |
| The Bailed T72 fails Remount, and a few of his fellows fail Cross Checks, but they are determined to get into the fight. |
 |
| Juicy targets in the woods. Unfortunately, missile AA is fantastic... if your opponent brings any air assets, otherwise they are only good for holding objectives. |
 |
| The Scorpions get some "special deliveries". |
 |
| Say "goodbye" to one of the Rapiers. |
 |
| The British Force Commander succumbs to concentrated 125mm cannon fire. |
 |
| This is supposed to be 1985, so I am sure some of my East Germans were singing Disco Inferno. |
 |
| The Scorpions are not liking this position now. |
 |
| I did try to bombard that last Rapier with my Carnations, but artillery is just no good against vehicles. Best used against Infantry. |
 |
| The state of the T72s, right as they won the battle, and I lost it because I did not CHECK THE RULES. |
 |
| The cavalry has arrived. |
 |
| "I say, old chap, do you fancy some 'flank' steak?" "By Jove, I do!" |
 |
| Scorpions hunting Shilkas. |
 |
| It is always better to give than it is to receive. |
 |
| All that buildup for one Bailed panzer. |
Turn Three - the Shilkas gather themselves up and begin charging around the hill in between them and the Scorpions. This is another mistake I made, as I should have either withdrawn the Force into the trees for cover, or used a Blitz move to get close enough to shoot at the Scorpions this turn. Not getting into visual range, but leaving the Shilkas in a position where the Scorpions can easily get to shooting range with a Tactical Move on their part of the Turn does me no good whatsoever. The Panzer Bataillon Formation Commander gets hung up on the low wall trying to get closer to the Brits; the T72s Remount their Bailed tank and charge towards the Chieftains, at least those that do not fail their Remount or Cross Checks, again, Bailing just one of the Chieftains; and the Carnations decide it is time to get into the fight and jump up on the road, but the . Our group's meta is very infantry light and vehicle heavy, I think I will be taking my artillery units out of both my East German and American forces and replacing them with other options. Maybe attack helos, still working on that decision.
Uriah's part of the Turn, and he manages to Remount his Bailed Chieftain; the last Force of Chieftains comes onto the table in the third they need to, the Schwerpunkt of this fight, the East Germans left and the British right; the M109s redeploy to better cover both Objectives; the Scorpions move Tactically to get shots on the Shilkas, but do not manage to do any damage to them; and the Chieftains blunt the attack of the charging T72s, outright destroying the lead three panzers.
 |
| Shilkas Remounted and passed their Cross Checks, ready for a fight. |
 |
| But they fail to get to a shooting position, partially through my mistake, and partially due to the good placement of that Minefield by Uriah. |
 |
| Cross Checks, not my friend. |
 |
| Kill those capitalistic dogs! |
 |
| Again, Cross Checks and Remounts, not my friends. |
 |
| Bombardments are not doing much, let us try some Direct Fire! |
 |
| A lot of shooting, and only one Bailed tank. Feh. |
 |
| The battle as it stands just before the British portion of the Turn. |
 |
| The cavalry arrives, part two. |
 |
| 155mm worth of firepower to watch over the Objectives. |
 |
| Peek-a-boo! |
 |
| First two Chieftains return the favor. |
 |
| The second pair of Chieftains weigh in. |
 |
| Those 120mm rifles are devastating, even to the Front Armor of T72Ms. |
Turn Four - the last remaining BMP-1, having done due diligence, finally fails its Force Morale and scampers off to remain in the land of the living; the T72s, not anywhere near making a Force Morale Check for either of the two Forces all kind of jumbled up together on this edge, push forward; well, some of them do, as the Bailed one in the trees remains Bailed and I fail some more Cross Checks, along with the Formation Commander, again; the Carnations follow their lead and fail their Cross Check on the impact crater section of road by the McDowell's restaurant; the Shilkas throw 18 dice (let me type that again, EIGHTEEN DICE!) of fire at the Scorpions... and due to hitting only seven of the shots and having a 5+ Firepower, manage to only Bail both of the remaining Scorpions; and the T72s manage to wipe out completely one Force of Chieftains. The Brits go, hardly moving from their last positions, though the remaining Rapier finally fails Morale and departs for greener pastures; the Scorpions both Remount and immediately destroy two of the three Shilkas in front of them; the M109s take the Carnations under Direct Fire and destroy one; and the Chieftains return the favor and destroy two more T72s.
 |
| The enemy is right there, might as well get to grips with them. |
 |
| More failed checks. |
 |
| That wall is poor Hans, the panzer driver's, nemesis. |
 |
| Driving is not the East Germans' strong skill this game. |
 |
| The Scorpions attempted a Shoot and Scoot last Turn, but did not make it. The Shilkas do not have to move and that suits them just fine. |
 |
| Craters, what can you do? |
 |
| Eighteen shots and this is all I get. *sigh* |
 |
| Four shots and three hits, this is more like it. |
 |
| Two more Chieftains down, two to go. |
 |
| The Scorpions have no issues Remounting. |
 |
| The M109s train out their cannon and shoot at the opposing artillery. |
 |
| Burning Shilkas due to Scorpion fire. |
 |
| Burning Carnation due to M109 fire. |
 |
| More burning T72s. |
 |
| Putting a die onto the last Shilka to remind myself to roll for Morale next Turn. |
Turn Five - Remounts are made, Cross Checks are made, but not for all, and the T72s move into the forest to get some cover; and the Commander and the remaining Carnations gather on the hill and take out a M109, then the Carnations Shoot and Scoot to move off the hill and into cover. I should have been more aggressive and moved more of my T72s into the woods, as the Tactical moves were a waste when I was not moving to get a shot but instead moving into cover. Also, again because I forgot to CHECK THE RULES, I did not realize that I had a time limit of six Turns to drive off the Brits or capture one of the Objectives, or lose the game to Uriah, and should have been far more aggressive at this point. Oh well.
The Scorpions move to start firing at the Carnations and the Formation Commander, destroying one Carnation; and the Chieftains move further back, to back up the M109s guarding the Objectives (because Uriah read the Mission and realized I should have been pushing harder towards them).
 |
| Finally getting some Remounts and Cross Checks passed. |
 |
| But not all. *sigh* |
 |
| All of the T72s should have been at this tree line at a minimum, pushing towards the Objectives. |
 |
| One M109 brews up. |
 |
| That hard push around the Brit's right flank is starting to show returns, but should have been happening a Turn sooner. |
 |
| Blurry photo, but the Carnations do pass their Shoot and Scoot to get off the hill and out of the line of fire of the M109s. |
 |
| The Scorpions, however, get some shots at the Carnations. |
 |
| The Chieftains move back some more, not having a good shot at the T72s and needing to guard the Objectives. |
 |
| One of the Carnations succumbs to Scorpion fire. |
Turn Six - I finally CHECK THE RULES, realize I need to get onto those Objectives NOW or lose the game, and I still move too timidly, using Tactical Moves, and I still cannot get many shots at the remaining British Units. I pile in as much as I can, managing to get only one T72 within capture range of the Objectives when I need to get as many vehicles onto the Objectives to keep Uriah from winning. To win Bridgehead, the Attacker has to start their Turn within 2" of an Objective(halved from 4" due to playing at 6mm scale, as we halve all distances except for weapons ranges) and end the same Turn with no Defenders within the same 2" of that Objective. The Defender, on the other hand, just has to end Turn Six or later with no Attackers within 4" of either Objective. As I did not start the Turn within 2" of any Objective, I would have to do so next Turn, so I should have just pushed all of my Units to the Objectives, hope one of the Units and the Commander live to be in Good Spirits next turn and work from there to remove enough of the Brits to win the game. But I did not, Uriah blows away my lone T72, and wins the game (forgetting the part above where I had actually won), Minor Victory, 6-3.
 |
| Squint and you can read the Winning the Game section... which I did not before this point in the game, silly bastard me. |
 |
| Close, but not close enough. |
 |
| Still failing Cross Checks. |
 |
| And more failed Cross Checks. |
 |
| The lone Carnation did manage to pass Morale. |
 |
| The Brits pile into the area around the Objectives and focus fire on that one T72 within 4" of the Objective. |
 |
| And the Brits manage to kill the one panzer they need to, ending the game. |
I will stop talking about the game and Lessons Learned from it right there, as I have typed enough about it at this point. Instead, I will say that after the game, a couple of us went over to Home Depot to pick up some materials to make some more terrain. I had picked up a coir pile outdoor mat, as I had seen those used to good effect as fields for 15mm models. When I got it in, however, I realized those mats, while good for 15mm scale miniatures, were WWWAAAYYY too big for 6mm scale minis. Unless your fields are near Chernobyl and this field of irradiated crops suddenly mutated to grow taller than 12 or 15 feet high (note: I live in Missouri, even tall corn does not get that tall). Anyway, we picked up some foam to turn into more hills, and a chunk of hardboard to make into bases for trees. Both of these are good sizes that you can transport in a standard sized vehicle instead of having to find a friend with a truck and borrow it. Started testing some painting on the foam and found that whatever Krylon spray paint is (acrylic, apparently), that paint just dissolves this foam, even through a clear coat. Testor's spray enamel, however, works just fine on the foam, and I base coated what I could with a green I had (flat olive drab), which I plan to fill in the gaps in the paint with a nice brown and then add some low modelling grass, like Woodland Scenics' Fine Turf, finally sealing the whole thing with Dullcote. Similar for the "woods" bases - color appropriately, add some turf, put in some 6mm scale trees I got from eBay (no, I do not have a link to those, but just search for "1/300 trees" and there is a lot of cheap options from China that will work).
That is our most recent Escalation League Game, hope everyone enjoyed it. Next game day will be in a few weeks from when I post this, and we are moving up to 75 points. Finally.


