It has been two months since our small group's last BatRep, but fear not - the weather has (mostly) improved, some of our job conflicts have (vastly) improved, and we are here again with another game played and some lessons learned. For our monthly Escalation League, we made the jump to 100 points, which opened the door for some more expensive Teams to make an appearance and made the game a lot more suspenseful, all the way to the very last Turn. I am going to state what happened and talk about what I would have done differently at the end of this report.
One hundred points was the decided upon lists, and Brandon brought out a combined force of Polish and Soviets to face off against Uriah's British. NATO picked Defend, WarPact picked Maneuver, and the roll resulted in Counterattack. The battlefield was a mix of hills and trees, with a few firing lanes, but nothing like the city streets in our last BatRep town battle. Brandon brought not quite as many T-55s as he could have, saving some room for Soviet T-62s and other things, but he still had 26 T-55s (2 companies of 10, 1 company of 5, and a battalion commander) on the field. Also from the Poles he brought in two recon units of BRDM-2s with four vehicles apiece, three Spandrels, four Shilkas, six Carnations and a BMP-1 OP for the artillery. For the Soviets he had two T-62 companies with six tanks apiece, plus one battalion commander track (13 T-62s total), and a four track BMP-1 recon unit, plus four Gaskin AA vehicles. One of these days one of us will get fixed-wing air onto the field and missile vehicles like this will be a must, but on this day, Brandon said he brought them in just to finish off the points at 100. Sometimes those last points are hard to use up. Facing this vast horde was Uriah's British, headed by a Chieftain squadron with two command tanks, and two three-track elements. In support were two Challengers (this was almost a quarter of the points for the entire Formation, which is why none of us have really played the high point vehicles until now), four Scorpions, three Swingfires, three Marksmen, an FV432 FOO, and three M109 self propelled artillery pieces. I had just gotten in a bunch of Abbots from Heroics & Ros, as they are the only manufacturer of those vehicles in 6mm, and I offered them up for him to use, but Uriah wanted to stick with the bigger 155mm guns of the M109s. The Abbots are awfully cute, though. He also had in his Formation a pair of Tracked Rapiers, but had forgotten the miniatures at home. As there were no aircraft on either side of the board, he just left them in Reserves the whole game (he actually never got them out via die roll, so it worked out). The Challengers were so costly that getting them onto the field from the beginning and not leaving them in Reserves to only show up at the whim of the Dice Gawds meant he had to put one of the three track Chieftain troops, the Marksmen, the artillery, the AA, and the Scorpions into Reserves. We have a joke in our group about the Scorpions, how the British should have named the tiny scout tanks Cockroaches, because in the past several games, it has been nearly impossible to destroy them all or drive them from the field. I am surprised Uriah has not added more Scorpions to his Formation.
 |
| Counterattack is fun but complicated. |
 |
| So many vehicles. |
 |
| The very Thin Blue Line. |
 |
| British Reserves. |
 |
| Not pictured, Tracked Rapier AA vehicles. |
Per the Counterattack rules (from the new missions pack I recently realized they had updated), Deployment went about how you would expect, excepting that Counterattack has some weird Deployment zones and Objective placement, so we were constantly referring to our Mission sheet. It also did not help that we do not have access to an actual 6-foot by 4-foot table, it is more 5-foot-11.5-inch by 30-inch table. Our current meeting space is a comic book store owned by a good friend of the group's and he is a little cramped on space at the moment. He is looking to move to a larger space, and we will probably "donate" one or two 8-foot by 4-foot tables (take a thick sheet of plywood, which is 8'x4', attack some support underneath and some legs, a lip around the upper edge, sand well and varnish, voila! instant wargaming tabletop with some extra space on the edges) to his new store. As part of this, Uriah originally deployed his tanks as if he was going to be attacked across the width of the table, and only when I pointed out where Brandon was about to Deploy, did he turn his vehicles to face his foe. Brandon used his many recon Units to get his bigger guns as close to the Objectives as possible. He also Deployed with an eye towards where Uriah's Reserve Units would be arriving on the table.
 |
| British Deployment, with Objectives and Ranged In tokens. |
 |
| The Challengers holding the middle line, a menacing presence. |
 |
| Chieftains forward backed by Swingfires and the FOO. |
 |
| The lead elements. Spearhead is a useful skill to have in your Formation. |
 |
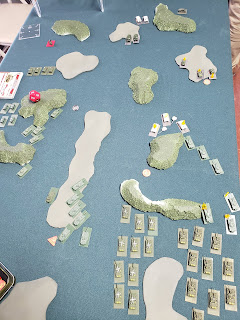
| They just keep going... |
 |
| ...and going. |
 |
| The Polish/Soviet Formations in their glory. |
TURN ONE: T-62s and scouts leading the way, the combined Polish/Soviet WarPact Force rolled forward, moving tactically to start putting shots on everything that was in Line of Sight. The lead British Chieftain Troop fell entirely to 115mm cannon fire (the 115mm of the T-62 is not as good as the T-72/64/80s 125mm, but you should not discount it), getting wiped out with no one left to do a Morale check. The Swingfires lurking behind those Chieftains also suffered, having two of their tracks Bailed out. Returning fire, the Brits inflicted two losses and a Bail on the T-62 company to their left front. This was the start of Uriah's bad luck with the dice, as he did not pull any Units from Reserves, and missed or failed Firepower with more shots than he actually connected with. The Challengers looked on menacingly from basically the middle of the field and the T-62s and T-55s did not even try to penetrate their formidable Front Armor.
 |
| WarPact driving forward on their right. |
 |
| And on their left. |
 |
| That is a lot of vehicles facing down very few vehicles. |
 |
| The Brits receiving fire. |
 |
| WarPact taking some casualties. |
TURN TWO: Shifting artillery fire and also adding in tank fire from multiple Units, Brandon managed to Destroy or Bail all of the Swingfires and the FV432 FOO, as the Challengers had not moved, but the command element of two Chieftains had ducked back into cover and no opposing Unit could get a Line of Sight to them. Again, no Reserves were forthcoming, and the remaining British Units hunkered down as the WarPact horde rolled forward and the last Swingfire failed Remount and ran off the board, failing Morale. The T-62s to the Brits' left-front did catch more fire and lost another track to cannon fire.
 |
| Round Two! |
 |
| There go most of the Swingfires and the FOO. |
 |
| Last Swingfire fails Remount and auto fails Morale. |
 |
| The T-62s are paying a price as well. |
TURN THREE: The T-62s push forward, trying to bring their better 115mm cannons to bear on the Challengers, a losing proposition for even the Soviet 125mm cannons, and not even worth the effort from the 100mm found in the T-55s. As Brandon stated after the game, he should have pushed harder at this point and tried to start contesting one or both Objectives sooner. He pushed recon elements closer to the Objective on the WarPact left, but held back the bulk of his T-55 Units in cover instead of Cross-Country Dashing them and hoped the Dice Gawds favored him. Which is what horde lists are for - you will lose Teams, just the name of the game, but can you get in close enough before you lose enough to start forcing Morale checks? After wiping another two Units last Turn, the Warsaw Pact Formations deliver no damage this Turn. In response, the Brits start maneuvering their Chieftain command element, get a troop of Chieftains out of Reserves (FINALLY!), and deal some damage of their own. They manage to finish off the T-62s to their left (WarPact right) and the T-62s in the middle receive fire from both the Challengers (destroying one and Bailing two) and the newly arrived Chieftains (destroying one).
 |
| Round Three! |
 |
| Those T-55s did not want to come under fire of the Challengers' and remaining Chieftains' 120mm rifles. |
 |
| Almost to the Objective on the WarPact left of the table. |
 |
| Recon elements moving back to make room for the tanks rushing ahead. |
 |
| Four British tanks versus a vast horde of WarPact metal. |
 |
| Finally, Reserves! |
 |
| T-62s on the WarPact right are wiped out. |
 |
| T-62s in the mid-field taking some "surprise buttsex" from the newly arrived Chieftains. |
TURN FOUR: The WarPact forces react, the T-62s in the midfield moving away from the Challengers guns to fire on the newly arrived Chieftains, their Formation command element making a 90-degree "adjustment" so they can eventually point their front armor at the biggest threat but still keep their non-moving ROF. The Spandrels moving up on the WarPact left make a Blitz move about face so they can rain some fire on the newly arrived Chieftains as well. Instead of investing the Objective on their left, or driving the T-55s pell-mell towards the Objective on the right, the WarPact forces hung back, which Brandon regretted later. Between the T-62s and the Spandrels, the Brits lose two Chieftains. The Brits in response make their Morale check with the Chieftains, leaving one deadly cannon in their rear, and bring on Marksmen from Reserves, who tactically move up towards the Spandrels, spraying them with 35mm cannon fire, but alas, it is all sound and fury, without even one Bailed Spandrel. The Chieftain command element slide further to their right (WarPact left) and destroy one of the BMPs leading the charge on the Objective on that side of the table. The remaining Chieftain fresh in from Reserves destroys two T-62s in the middle of the field. The Dice Gawds giveth, and the Dice Gawds taketh in equal measure.
 |
| Round Four! |
 |
| T-62s shift. Yes, that is a M60A2 Starship turret to mark the T-62 formation commander. |
 |
| The Spandrels wheel around as well. |
 |
| Chieftains catching the hate. |
 |
| Marksmen to the rescue! |
 |
| Chieftains shifting over. |
 |
| "Stay away from that Objective! I won't tell you again!" |
 |
| T-62s on the receiving end of incoming fire. |
 |
| Challengers shifting over after shooting up the T-62s. |
TURN FIVE: The Warsaw Pact continues to creep forward (this mission is decided on if the attacker gets to and captures one of the Objectives before the end of Turn Six, it was becoming obvious to me that Brandon was not pushing hard enough at this point) moving up one of its T-55 companies, but not enough. The other large T-55 company remains completely in cover and too far away to affect either Objective in a meaningful way. The last T-55 element wheels around to fire at the Marksmen and whatever else is coming out of Reserves. The last T-62 company manages to remount its Bailed tank, and along with their command element, maneuver to face the incoming British Reserves. The WarPact Shilkas, chilling in the rear up to this point, maneuver to also add their guns to the fire pouring in on the British Reserves. Shots from multiple directions takes out the last of the just arrived Chieftains and destroys one/Bails one of the Marksmen. The Brits manage to Remount the Bailed Marksmen, and they press forward trying to cause more damage to the recon vehicles to their front. From Reserves, the Brits get two more Units, the artillery and the Scorpions. The Tracked Rapiers remain in Reserves as Uriah did not manage to roll high enough to get them on this Turn and did not even try next Turn. The Scorpions maneuver forward to engage the Shilkas threatening the salient, the artillery tries some direct fire of their own to no effect, and the Chieftain command element continues maneuvering to put the BMP recon element under fire over by the far side Objective (WarPact left/NATO right), destroying one more BMP. The Marksmen finally finish off the Spandrels, throwing a lot of dice to get three kills.
 |
| Round Five! |
 |
| T-55s creeping forward. |
 |
| T-55s turning to deal with the new threat. |
 |
| T-62s maneuvering to deal with the new threat. |
 |
| Chieftains are out, Marksmen are wounded. |
 |
Marksmen charge the Spandrels while Scorpions and M109s enter the fray.
|
 |
| Scorpions facing down Shilkas. |
 |
| Command element and Challenger maneuvers. |
 |
| T-55s are not quite far enough into cover. |
 |
| Scorpions manage to get one Shilka. |
 |
| Marksmen get all the Spandrels. |
 |
| Chieftain command gets one more BMP. |
TURN SIX: Here it is, for all the marbles, the final Turn of this game. Remember, the attackers win if they can get one of their Units to within 4" of either Objective and no defending Units within that bubble on or before this Turn. The defenders win if on or after Turn Six, there are no attackers within 4" of both Objectives. Has the WarPact force pushed ahead fast enough? Can they get so many vehicles on either Objective they can force the Brits to commit Units to also sit directly on top of the Objectives to keep the game going? Get ready, because we are about to find out!
The WarPact do the only thing they can - they push the remaining BMPs and one Unit of BRDM-2 scouts to the Objective to their left (NATO right), getting close enough to contest. Everything else moves, but being too hesitant in previous Turns, is too far away to contest either Objective and cannot put in Side Armor shots on the Challengers. The WarPact forces do fire on the newly arrived Reserves, nearly wiping out the M109s (155mm cannons in direct fire mode are scarier than they are effective) and Scorpions, and finishing off the remaining Marksmen. At this point, the WarPact recon elements just have to hold onto the Objective they are sitting on and hope some of the Teams survive the British Shooting Phase. Or the British can move their Chieftains to within contesting distance of the Objective as well, and drag this game out into Turn Seven. Uriah manages to Remount the Bailed Scorpion keeping them in Good Spirits (I don't know where the 4th Scorpion went, but it was destroyed by that point, anyway), while the M109s fail Morale and the last one scurries off the board. The Challengers split their fire, managing to take out two of the T-55s coming in from NATO left (WarPact right) and destroying one and Bailing one of the last BMPs. The Chieftain command element finishes off the BRDM-2 Scouts. With no Teams Mounted, the WarPact Force is no longer contesting the Objective, and they lose the game. Brits win, but not without suffering heavy casualties.
 |
| Round Six! |
 |
| Finally contesting the Objective. |
 |
| T-55s pushing forward, too little and too late. |
 |
| The British Reserves catching fire. |
 |
| The Marksmen have left the building. |
 |
| The Cockroaches (er, Scorpions) are still around, but the M109s are out. |
 |
| T-55s burning. |
 |
| The winning Shooting Phase - all enemy vehicles near the Objective are Destroyed or Bailed, so they cannot contest, and it is the end of Turn Six, so Defenders win the game. |
As I said before, Brandon bemoaned his performance in this game, saying he should have pushed harder, used his artillery better (it got the FOO and one of the Scorpions), and generally should have been on one or both Objectives by Turn Three, Four at the latest. I agree with him. For me, I would have put the BMP OP up closer to the front and used the six gun Carnation battery to lay down a Smoke Bombardment (turns out you can only do this once per game, though most artillery with Direct Fire options also have Smoke as a Direct Fire Option and can do it more than once) in front of the scary-scary Challengers to then move everything forward at Dash speeds to get to Objectives and Side Armor shots quicker. Facing off against tanks like the Challenger with T-55s (no chance of penetrating or Bailing at all) or T-62s (50/50 chance of penetrating) from the front is a losing game, especially when you are Hit On 3+ and they are Hit On 4+, +1 for cover. I also would have pushed the recon elements and the "useless" Gaskins (no aircraft either side) into charging for the Objectives to try and capture them early. So what if they die? We are not keeping track of points here, and even wins/losses we barely acknowledge. In a tournament where every point counts, yes, I would have held back the recon and AA elements so I am not "feeding" my opponent points, but in our league where we are just having fun and going for the win, I would throw those elements out to die first, if nothing else to buy my tanks time to close with the enemy. Another thing I would have done differently if I were the WarPact player, is move the Objective further away from the back edge of the table. Per the Mission brief, you had most of the table quarter to put Objectives into, it would have been better for him to have that Objective as close to his Deployment as possible. Always look ahead in the Mission brief and see what you need to win the scenario. If, like in Counterattack, it is capture either Objective, move the Objective you control as close to your Deployment as you can get it, and as far away from your opponent's Deployment as possible.
Playing from the opposite side of the table, I would have put the Swingfires and Chieftains further back - Swingfires have Hammerhead (it is not really a Hammerhead launcher, just the nature of the missile itself allows it to be hull down behind the crest of a hill and launch missiles at distant targets) and I would have put them deeper into cover and used what I call "the Swingfire trick"; the Chieftains did not need to be that far forward, and I would have put them in a position to maneuver and invest the WarPact Objective on Turn One. Let me explain the Swingfire trick - Deploy them into full cover, but within a Blitz move of getting a Line of Sight, as Defenders, this keeps them from getting shot the first turn because their is no Line of Sight to them, then moving into a firing position (if the Blitz goes off, always a gamble) to fire as if they had not moved, catch some hate next turn, return some hate of their own if any survived, and then move into cover (if the Shoot & Scoot goes off, again, a gamble) which gives them breathing room to maneuver to another part of the field, or repeat and get another couple of turns of shooting. And keeping everything towards the back of your Deployment Zone - That last round of firing, having one Challenger shoot at the T-55s was a waste, in my opinion. I would have done something like a Blitz to unmask the cannon of the far Challenger and put all my shots into the targets around the Objective. It still worked for Uriah, but the Dice Gawds could have easily swung it the other way. Because if any one of those vehicles had remained whole and not Bailed or destroyed, and because Uriah did not get any of his vehicles closer to the Objective (I would have also tried a Blitz with the Chieftains, keep their Halted ROF but put them in contention distance of the Objective), the game would have gone to Brandon instead.
When I set up this field, I placed hills and trees randomly, but it really reminded me of a tournament paintball field - you can fire forward at the opponent who is also peeking out of their "bunker" (piece of cover), but your more effective firing arcs are diagonal across the table, and you can shoot that arc while staying deeper into cover. I keep forgetting to do that when I am playing (see the last Lessons Learned and the "fun" I had in an urban environment). I also need to remember that hills and trees are not impassible - they do not slow down your Tactical speed, only your Cross-Country Dash slows down to a Terrain Dash, and you also have to make a Cross Check on entering, moving within, or exiting (but only one check per Turn), but beyond that, go over the hill, go through the woods. Use infantry to clear mine fields and let armor move through. If you are playing horde, the attrition game is what you want, so drive forward the first few Turns and do not worry about shooting back until you are on top of, or almost on top of the enemy. Also for my local meta (and since I share these BatReps with them, we will see how well everyone pays attention), hardly anyone brings air (fixed or rotary wing) or infantry to our games. Yes, tank-heavy units are cheaper in what you need to buy, mini-wise, and easier to paint and field, but will they be able to respond when I bring in helos, strike aircraft, and hordes of mechanized/air assault infantry? Which reminds me that I need to buy more Soviet infantry as I need many, MANY more stands of WarPact infantry to build even a 100 point BMP-heavy infantry force. How many stands? Six PKM teams, 18 RPG-7 teams and 21 MPi KM teams w/RPG-18s - yep, 45 stands of infantry alone. I am most of the way there with what I already have, but this is at 100 points, and it just gets worse the higher points climb. Not to mention if I were to set out a "leafblower" Hind air assault battalion - 30 AK-74 teams, 4 AT-4 Spigots, 6 PKMs, and 27 RPG-7s all riding in 12 Hinds (67 infantry stands total... what is this, Iranian Basij?!). With both forces, they are very much "glass cannons", lots of dice in Shooting, little armor or just a save when receiving fire.
When Deploying your Units, make sure they can get to where you want them to go by the Mission end Turn. Most Missions end at or before Turn 6. If you expect a Unit to make it all the way to an Objective by that Turn, and they do not have a high movement speed, you will need to make sure they are Deployed as far forward as possible. And do not forget to take into account if you want to fire, as Tactical movement distances are shorter (much shorter in some cases, like Scorpions - speed demons when they are not shooting, cute little snails when they are firing) and will greatly affect your plans if you do not think about it ahead of time. Talking about the "Swingfire trick" earlier, which applies to all ATGM-firing ground vehicles that have Moving ROF of "-", made me think about movement in the game - I want these little missile guys to cover this lane at the beginning, I think to myself in Deployment, but where do I want them to go after that? Do I need them to possibly cover another avenue of approach later in the game? I need to do more of this kind of planning before Deployment, and not just plunk my Units down where they look cool. This is higher level strategy discussion, but is that not the Lessons we are trying to Learn around here?
Okay folks, hope you enjoyed the BarRep, and maybe even learned something from my rambling nonsense. Get out there, put some miniatures on the table and roll some dice with your friends!
