Fatal funnels are fatal, even for tanks. M60A3 Pattons are deadly to T-72M tanks, more so than the points differential will lead you to believe. Sometimes it is better to bring slower infantry to the fight instead of tanks, especially in built up cities, but if that is all the infantry you have on stands and in your box on game day, then that is what you play with. Plus, if you cannot show off all the pretty buildings you have been busy 3d printing, why bother? Sometimes it is better to move further than to be able to shoot, and knowing when to do which is important. Do not forget that your artillery battery has a Smoke option, and that it can work even on Units with Thermal Imaging in the right circumstances.
Yes, once again, our small band of intrepid wargamers met, placed a bunch of terrain on the table, and slugged it out in 1/285th scale using the World War III: Team Yankee rules. I stated a few things I learned from the game already, let us see what else can be learned. We decided, as there were just three of us that we would do a two on one game - Brandon's 75 points of Americans and Uriah's 75 points of British versus my 150 points of East Germans. As I have already said above, I had been busy with my little 3d printer and made a bunch of new buildings for our community terrain collection. Since I wanted to use as many of the buildings as possible, and I only have so many city street pieces, so the resulting city was a very claustrophobic affair. But good looking - as long as you ignore the lack of painting and the rest of the unfinished terrain pieces. Oh sure, like you do not have a pile of unpainted lead and terrain bits.
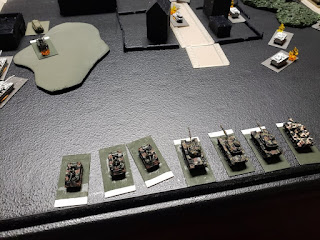
 |
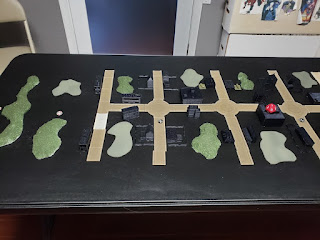
| The initial setup, with Minefields and Ranged In markers already placed. |
 |
| My little printer was really humming. |
 |
| I do need to finish off the hill and tree plates. |
 |
| I like a lot of terrain on the table, but it worked against me in this game. |
WarPact player (me) picked Attack (naturally), and after a short discussion, NATO decided on Defend. The die was rolled and we got Bridgehead. We have been using the older Missions pack, not the updated new one and there are a few differences, so if you are trying to double check me, remember, older Mission pack (and if you have read previous BatReps, it is a proven fact that I am crap). There is also a new FAQ out that you should check out if you have not. Having a lot of models, but more tanks than infantry, I went over to Forces and put together an East German T-72M Panzer Bataillon and I still had to borrow six T-72s to put enough tracks onto the board. I maxed out T-72s, with 31 total (one commander and three Kompanies with 10 panzers apiece), two sets of BMP-1 scouts (one in Formation, one from Divisional Support), a BMP-1 Mot Schutzen Kompanie (12 BMP-1s, two PKM teams, nine RPG-7 teams, and 10 rifle teams), four Shilkas, six Carnations for artillery support, and a BMP OP. The Americans (played by Brandon) brought M60A3 Pattons... lots and lots of Pattons. We have found that Pattons, point for point, are very good, especially in our local meta, as none of us are bringing the WarPact heavy hitters (Russian T-72s, or the T-64s or T-80s) to the table, quite yet. The Americans brought a full M60A3 Patton Company (two tank lead element, three platoons of four tracks each), backed up by a M901 ITV AT platoon, a scout section (one M113 and one M901), a platoon of M106 Heavy Mortars, a section of four VADS from Divisional Support and a HMMWV Scout Section also from Divisional Support (all TOW bearing vehicles were upgraded to TOW-2). The Brits brought another Death or Glory Boys Chieftain Armoured Squadron - a two track command element, leading two troops of three tracks apiece, backed up by four Scorpions, three Swingfires, and from Divisional Support, four M109s (Uriah still has not picked up any Abbots, but as none of our local, read that as "on our continent", mini manufacturers make Abbots, so the options are Heroics & Ros or, well, no one else, and we have been talking about making a group order to H&R, but have not gotten around to it yet), three Marksmen, and a FV432 FOO.
Per the Mission rules, in Reserve, the Brits placed the Chieftain command element and one troop of Chieftains, and the Marksmen. The Americans placed all of the Pattons into Reserve, minus one platoon, and that platoon was put into Ambush. The NATO Forces deployed in their small area, British and American Units right next to each other. The East Germans, looking at the narrow corridors of roads and buildings, the minefields and Ranged In areas, gritted their teeth and deployed with an eye towards battering their way to the Objectives as fast as possible, with artillery set up to rain whatever hell they could and the Shilkas poised to make a table crossing charge down the WarPact right flank.
 |
| You knew this was coming. |
 |
| Yep, that is a lot of white metal minis. |
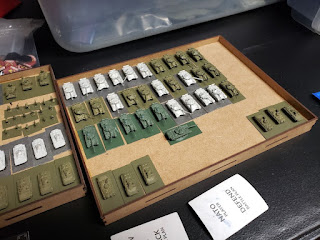 |
| More East German minis. |
 |
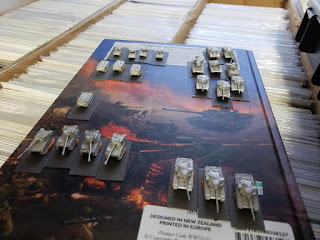
| The American Force. |
 |
| The British Force. |
 |
| British Reserves. |
 |
| American Reserves. |
 |
| American Ambushers. |
 |
| NATO right flank. |
 |
| NATO left flank. |
 |
| WarPact left flank. |
 |
| WarPact center. |
 |
| WarPact right/center. |
 |
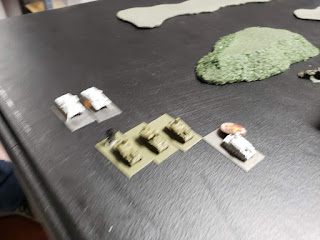
| WarPact far right flank. |
 |
| WarPact far left. This was a lonely area of the table all game. |
Turn One - As I hinted at earlier, the Germans charged towards the Objectives, firing at what they could see. As I was facing the smallest possible enemy Force at this point, instead of trying to thin their numbers, I should have moved as fast as I could (possibly even using my artillery assets to lay smoke in front of the Chieftains I could see to help protect the Panzer Kompanie in the center, thank you to a possible new member of our little group for that tip) and tried to end the game before any Reserves showed up. I did not do that. All of the non-scouting elements the East Germans brought with them moved Tactically and fired, except the Shilkas on the far right which Dashed and headed for the flank of the NATO Force. The shots the WarPact Force took resulted in one Bailed Swingfire and one Bailed Chieftain - not worth the price of the NATO return fire. NATO stood their ground, though a Platoon of Pattons did come out of Ambush (sneaky buggers), but in returning fire, outright destroyed one T-72M on the WarPact left, a BMP-1 scout in the center, four T-72Ms in the center formation (completely blocking that road), three BMP-1s from the Mot-Schutzen Bataillon (plus Bailing another, killing three stands of infantry, and Pinning all the infantry that had managed to Dismount from burning BMPs), and five T-72Ms for the WarPact right (and Bailing one more).
At this point, the end was in sight, though I did not realize it until the end of the game. Yes, I had made the board setup and even though I knew it was too tight and even though I fully understand what Fatal Funnels and Linear Danger Areas are due to my military experience, I still moved too slow and into said shooting galleries. Plus, if I wanted to play the attrition game and with such restricted movement of the city, I should have brought far more infantry and far fewer tanks, moving more slowly from cover to cover and striking from hardened strongpoints (ie: buildings and trees). I will say in my defense that I did not bring more infantry because I did not have it made up then nor do I have it as I type this. Knowing that now, I should have still changed my tactics, especially after the disastrous first Turn, but I did not. Even with no NATO Reserves showing up until the very end, I was still losing the battle of attrition, and missed my chance to end the game instead of trusting to the Luck of the Dice (hint: if your plan is Dice Luck, your plan is not smart nor sneaky enough to slap a tail on it and call it a weasel). The rest of the game went pretty much as you read above, so I will skip the blow by blow and just paste up the rest of the pretty pictures with more discussion after the last of it.
 |
| WarPact left advancing. I should have swung them wider to the left and come down the back of the NATO Deployment area. |
 |
| WarPact center. Should have smoked the Chieftains and Road Dashed this Kompanie. |
 |
| WarPact right. The BMPs Dashed, but the T-72Ms did not. |
 |
| WarPact far right. The Shilkas Dashing was good on my part, but I should have put them on the other side of the woods to their right, the "snake" for you paintball players in the audience. |
 |
| Chieftains receiving fire. |
 |
| Swingfires receiving fire. |
 |
| WarPact left catching return fire. |
 |
| WarPact center showing burning tracks. |
 |
| That is one blocked road. |
 |
| The Mot Schutzen catching fire. |
 |
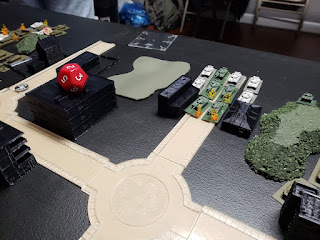
| The Ambushing Pattons and their targets, the T-72Ms on the WarPact right. |
 |
| Three dead stands of infantry. |
 |
| Turn Two. |
 |
| Swingfires and Scorpions catch fire and one of the HMMWVs in the rear is Bailed. |
 |
| Burning and Bailed Chieftains, NATO center. |
 |
| British M109s Destroyed and Bailed. |
 |
| For all the damage they did last Turn, only one Patton was Destroyed in response. As I said, I was losing the war of attrition and just did not realize it. |
 |
| The T-72Ms on the WarPact right maneuvering to get shots at the Pattons. |
 |
| The BMPs still able maneuvered away from the still Pinned infantry. |
 |
| The T-72Ms in the WarPact center finally maneuvering around the linear danger area of the road and towards the Objective. |
 |
| T-72Ms and BMP scouts on the WarPact left maneuvering towards the enemy. |
 |
| Swingfires and Scorpions maneuvering to take shots at different foes, the T-72Ms next Turn (the newly burning T-72Ms are from the HMMWVs fire) and the BMP scouts this Turn. |
 |
| One burning BMP scout and two burning T-72Ms. |
 |
| Chieftains finally moving to cover the Objective on the NATO left. |
 |
| The maneuvering T-72Ms on the WarPact right fare no better against three Pattons versus four, losing almost the entire Kompanie this Turn. |
 |
| The Mot Schutzen catching more hell. |
 |
| Turn Three. As it turns out, the last Turn of our little match, and the most exciting. |
 |
| The T-72Ms on the WarPact left have a good Turn, forcing the HMMWVs to Remount and pass Morale next Turn, and wiping out the Swingfires entirely. |
 |
| The Scorpions, likewise, catch hell from the BMP Scouts, though I am unsure if that is two Destroyed Scorpions, or one Destroyed and one accidentally knocked off turret. |
 |
| American Scout Section facing Morale next Turn. Brandon played it right and when the M901 ITV was Destroyed, used Mistaken Target to move it to the M113. |
 |
| Chieftains in the NATO center facing a Morale Check. |
 |
| Apologies for the blurry photo, but that is the British M109 Battery facing Morale Check soon. |
 |
| The Shilkas, finally making it around the side of the NATO Force Destroy one and Bail two VADS, in response to what the VADS did to the infantry last Turn. |
 |
| The infantry Dismount from the lead BMPs and run past the British artillery observer on their way to the Objective. |
 |
| The BMPs still trying to do something to the M901s in the trees, but remain unsuccessful due to Cover and Hammerhead. |
 |
| Shilkas, triumphant. |
 |
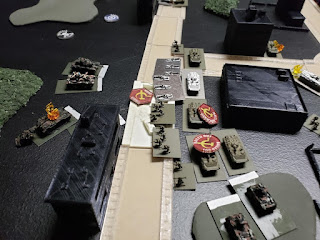
| WarPact center maneuvering to support the infantry charge. |
 |
| This is the moment I fully lost the game - five Units came in from Reserves. The first, a Platoon of Pattons on the NATO right, which immediately Destroyed the T-72M Kompanie on the WarPact left. |
 |
| So many burning tracks. |
 |
| Another Reserve Platoon of Pattons in the NATO center. The M106 Heavy Mortars did not do a whole lot this game, but that was about the least of the NATO's problems. |
 |
| A Troop of Chieftains and Marksmen from Reserve in the NATO center move forward and prepare to cover the Objective. |
 |
| Burning Force commander and BMP Scouts. |
 |
| Even the WarPact BMP forward observer is Destroyed. |
 |
| Blurry picture, again, but that is one Destroyed and one Bailed Shilka, with the Chieftain command element coming in from Reserves directly behind them. |
 |
| VADS still in the fight, though the M109s to their right failed Morale and the remaining tube scampered for home. |
 |
| More carnage among the Mot Schutzen. |
 |
| The final resting place of the T-72Ms on the WarPact right. |
 |
| Even though we did not go into Turn Four, we decided to check and see if this unit could Remount and pass Morale, out of curiosity, and it did not make it. |
 |
| The Pattons turned their attention to the BMPs in front of them, and you can see the results. |
 |
| More BMP/infantry carnage. |
 |
| The end of the Game. |
At the end, with so many NATO Units coming onto the field from Reserve, and so many of my Units Destroyed, I conceded the game. Yes, I managed to reap a terrible price from the NATO Forces, but it was still not enough and I could not see any way to get enough men and vehicles onto either Objective and push off the defenders. At the mid point of Turn Three, after I had gone and before Brandon and Uriah got a go, it looked like I had everything well in hand... and then they brought five Units in from Reserves, and proceeded to Destroy almost enough of my Units to force a Formation Morale Check (not quite, but it was still close). Many lessons learned, that I hope to implement going forward. It was great fun, and so glad I had printed up so many new buildings. I doubt any of us will do such a tight city setup with so many roads allowing direct lines of sight, but it is nice having options. Now on to painting up and finishing off more terrain.
In the meantime, get out there, play some games with your friends, and enjoy the New Year.
No comments:
Post a Comment